Our friend Lisa's daughter has contacted family. Rachel is safe. We'll post more when Lisa has had more time to process everything. Thank you all so much for your concern!
- Kelly
(Wendy's sister)
Friday, October 9, 2009
Rachel Lee, My Friend's Daughter, Is Missing

I know this isn't a cookbook post. I hope you'll forgive me. But, this is not some random missing kid post that's probably out of date. No. This is my friend Lisa's daughter. She's been missing since Wednesday evening. Please, especially if you're in Oregon, keep an eye out, get the word out, pray if you're a praying sort.
Rachel Lee is missing.
Sunday, September 6, 2009
By "Cheese" We Mean "Tillamook": Cheddar Cheese Puffs With A Surprise
 The Clackamas County Fair is my fair, as I've already waxed quasi-lyrically about, and so you might think that I'd logically take the Clackamas County Fair recipe from The County Fair Cookbook
I'll just say it. I'm sure Mabel Johnson is a lovely woman, but her recipe for sweet and sour kidney beans just doesn't float my blogging boat. It's not even a vegetarian recipe, so I can't be guilted into putting it up to balance out the ham and Spam. I love you Clackamas County, but a little bird tells me the Extension volunteers might put together a cookbook for a fundraiser at some point, and so I'll wait until then to do my proper homegirl salute. But, there should be something from Oregon...
The Tillamook County Fair is held in Tillamook, Oregon, the second week of August -- Wednesday through Saturday. They are home to the only Pig-N-Ford races in the nation, and if you don't know what those are, hop on over to that link and check 'em out. Tillamook, it seems, is more than just beautiful sea views and the world's best darned cheese.
The cheese really is amazing, and now you can get it in the grocery store nearly anywhere in the States, so there's no reason to use anything other than proper Tillamook when you make this recipe:
Cheddar Cheese Puffs With A SurpriseAaaah, cheesy olivey salty goodness. I'd say that 48 puffs serve 4 rabid happy hour folks. I know that a proper cocktail party guide might suggest that each person will have 2-4 olives, but c'mon. There's Tillamook. There's olives. There's heat, blending them together. You're going to eat more than 4.
Mildred Davy's late husband, John, worked for many years at the Tillamook County creamery. Their excellent cheddar appeared frequently on the Davy family table. If you can't get Tillamook cheese, use any fine cheddar.
Makes 48 puffs
2 cups grated sharp Tillamook, or other cheddar
8 tablespoons (1 stick) butter, at room temperature
1 cup sifted flour
1/2 teaspoon salt
1/2 teaspoon paprika
48 small green stuffed olives, well drained
• Preheat the oven to 400 degrees.
1. Blend the grated cheese and butter. Stir in the flour, salt and paprika. (This can all be done in a food processor equipped with the metal blade.)
2. Mold 1 teaspoon of the mixture around each olive. Chill the puffs until firm, about 30 minutes. Arrange the puffs on ungreased baking sheets.
3. Bake for 15 minutes or until browned. (You can also freeze the puffs, well wrapped, for about 10 days. Bake them, still frozen, until browned.)
These go particularly well in the time before the turkey is done on Thanksgiving. You can heat them in small batches in your toaster oven, so that you're not disturbing the rolls, yams, Brussels sprouts, or bird.
You can choose what kind of stuffing you want in your olives. The classic pimento is fine, but if you want to grab the garlic- or almond- or even blue-cheese-stuffed ones from the fancy cocktail section of your favorite store, I won't say no.
Do get Tillamook, though. Chefly Husband came up with a great metaphor for why he, the Wisconsin Boy, could still eat Tillamook without the cheese police coming after him. See, evidently, the Wisconsin cheese is like the very best blended whiskey. Tillamook? Well, Tillamook is single malt Scotch. It's similar in composition, but a completely different beast. Get the single malt of cheese; get Tillamook.
And that's it for The County Fair Cookbook
Friday, September 4, 2009
Super Easy Preserving: Pickled Cherries
Oh, who am I kidding? I'm glad that I posted Hot Spicy Candy, but I just can't stop thinking about these cherries... The County Fair CookbookThe Long Island Fair is the oldest continuously operated fair in the country having begun in 1842, first in farmers’ fields or empty lots, then in Mineola at the present site of the County Court House complex, and finally moving to Old Bethpage Village in 1970 (History). The Fair features rides, amusements, entertainment for young and old, and agricultural and horticultural competition for cash prizes common to Long Island a century ago and is the only New York State sanctioned agricultural and horticultural fair for Long Island. Prize competition is open to anyone not only in vegetables, fruits and flowers but also for baking, crafts, hobbies and agricultural skills – cross cut sawing and corn husking.Rock on, Long Island agriculture! The fair runs for eight days in mid-October, so you've got time to plan your trip up to (or down to, or over to, I suppose) Old Bethpage. Old Bethpage: It's closer to civilization than Smithtown. Okay, so odds are the Chamber of Commerce isn't going to hire me to write their new tagline...and really, you have to go even further out on the island to get to the heritage of the next recipe.
Wickham's Fruit Farm is over 200 acres of farmy goodness next to Peconic Bay in Cutchogue. The Wickham family has been farming those acres for about three hundred years. This feels like a good time to say that the first time I came to the East Coast, I was in a cab in Boston, and said to the cabbie, "Today, I saw things that are older than my state!" The cabbie replied, "Honey, in Boston, there are things older than dirt." That's how I feel about saying one family's been doing anything for 300 years in one spot in this country, especially when that family has a very non-native last name. Anyway. The Wickham story is pretty darned compelling, but what you really need to know is this: they make cider, and they make donuts, and I'm betting that means they make...
...cider donuts...
Cider donuts are one of the best things in this crazy world of ours, and it's fall now, so I suggest you hightail it to the nearest place you can, and get yourself some.
But this is a blog about cookbooks and recipes, so let's look at one of the Wickham family recipes.
Wickham Family Pickled CherriesLook at that... preserving without processing! Putting up fruit doesn't get much easier than this, folks.
"No need to process these cherries in a water bath," says Mrs. Wickham. "They'll keep all winter on the shelf. We serve them as an accompaniment to poultry or meat."
Sour cherries (any amount)
Cider vinegar to cover
Sugar
1. Wash, stem and pit the cherries. Place them in a bowl and cover with cider vinegar. Let stand overnight.
2. Pour off and discard the vinegar. Measure the cherries and add an equal amount of sugar to them. Let stand until the sugar dissolves, stirring occasionally. Put the cherries in very clean jars and cover. Store in a cool dark place.
In step one, I'd suggest covering the bowl with cheesecloth or cling film, and leaving the bowl out on the counter -- not in the fridge. If you're wondering how to get "very clean jars," I'd say that those of you with dishwashers are going to need to run the washer on hot, and let the washer do the drying, too -- don't let 'em drip dry. Heat is your friend for sanitation purposes. For those of you more like, well, me, with only a sink and a dish drainer to help you out, wash the jars well in hot, soapy water. Let dry. Then, sanitize the buggers. I know, I know, part of the charm of this recipe is that you're not processing the jar in a water bath, but sanitizing is your friend, and a big ol' pot of boiling water goes a long way towards ensuring food safety. If you just can't bring yourself to do it with boiling water, or you have any inklings that your jar can't take the heat, use bleach -- 1 tablespoon per gallon of water. Soak for 20 minutes, drain. Let air dry. If you want to rinse the jar after that, do so only with boiled water.
Yes, I'm the sister of an Extension employee. Food safety is important. Don't muck about with bacteria.
And, it's STILL the easiest darned preserving method I've seen, other than "put fruit and booze in a jar, let sit for months, then drink." This one even has the benefit of creating food, not, well, booze, so it's ... at least different.
Sour cherries can be hard to find; you can use frozen, I guess, but better to find an orchard and pick your own when you can. When measuring the cherries and sugar, measure by weight, not volume, if at all possible. As it's not baking, I won't yell at you if you don't have a scale, and have to go the volume route.
Thursday, September 3, 2009
Exiled No More: Hot Spicy Candy
The Midatlantic section of The County Fair CookbookThe Sussex County Farm & Horse Show takes place the first week of August, most years, in Augusta, New Jersey. It's one of the larger fairs in the Northeast, evidently. Jane Brodhecker raises lambs, and though I love me some lamb, it's her candy recipe that makes me go "ooo."
Hot Spicy Candy...damn, that DOES sound easy! And far less apt to leave you with hard candy that tastes either of butter or vegetable oil, which always happens to me when I try to make lollipops and I have to grease the molds...
"The recipe comes from my Indiana grandmother," says Jane. "We made this candy with our children, and now they make it with theirs. Before Christmas everybody comes to the farm and we make batches together in several flavors. We use red coloring for cinnamon candy, black for anise, and purple for spearmint. Then we mix them and put them in airtight containers for gifts. The procedure sounds complicated, but making this candy is really simple." Flavored oils -- cinnamon, anise, wintergreen and others -- can be found at many pharmacies and sometimes at specialty food shops. Intense fruit flavorings are good, too. Paste coloring agents are sold at bakers' supplies stores and craft shops.
Makes about 4 cups
3 1/4 cups granulated sugar
1 1/2 cups light corn syrup
1 cup water
Paste or liquid pure food coloring
1 dram (scant teaspoon) oil of cinnamon, clove or peppermint, or fruit flavoring
2 pounds confectioners' sugar (see Note
1. Place the sugar, syrup and water in a large saucepan. Bring slowly to the boil, with a candy thermometer attached to the side of the pan. Heat the mixture to exactly 290 degrees. (This will take 15 to 20 minutes.) Higher, the candy sets too hard; short of 290, it won't set up. Remove from the heat and add the desired color. Paste colors are intense; a dab on a toothpick should give a deep color. Be careful with liquid colors -- too much may dilute the candy mixture and impede setting.
2. Stir in the oil flavoring. Stand back! The mixture steams up and releases strong fumes.
3. Have ready 3 jelly roll pans on which you have places a 3/4-inch-thick fluffy layer of confectioners' sugar. With a finger, trace a large spiral trough in each pan.
4. Carefully pour the liquid into the troughs -- the little walls of confectioners' sugar keep it from spreading. When the candy has hardened and is cool enough to touch -- a matter of minutes -- take scissors and snip it into short pieces, or snap off pieces with your fingers. Roll them in the sugar. Sealed in containers, the candy lasts for months.
NOTE: You can reuse the confectioners' sugar. Between candy-making bouts, store the sugar in a self-sealing plastic bag.
I wonder a bit at the order of the steps, and suggest that you make sure you do the prep for step 3 before you get anything else going. At least do it well before you've got a pot of fully molten sugar and oil ready.
I love old fashioned candy flavors. When I was in Salem, Massachusetts, I practically ran to Ye Olde Pepper Candy Companie to stock up on anise and clove candies. I'll admit: most people I know don't care for anise or clove candy. Poor souls! The spiciness combines with the sweet? Delightful! So much more interesting than sweet-on-sweet. Then again, I also love licorice (especially salted licorice), and absinthe, so I may just be a weirdo. And fennel! Love fennel.
After my buttered lollies failures, I'd pretty much sworn off hard candy making. The sugar trough method may bring me back from my candy land exile.
Wednesday, September 2, 2009
You Knew It Had To Happen: Midwest Spam Salad
At this point, none of you will be surprised to hear that when I saw this recipe in The County Fair CookbookThis recipe comes to us from the Stephenson County Fair, which is held every July -- so you're out of luck for this year.
Midwest Spam SaladIt's so darned hard to type without including serial commas. Serial commas are good! Serial commas make sense! Serial commas are not to be found in this cookbook.
Rosann DeVoe entered her dish in the Stephenson County Fair SPAM contest in Illinois.
Makes 12 servings
1 cup salad dressing (such as Miracle Whip)
1 tablespoon prepared mustard
3 tablespoons sugar
1/4 teaspoon pepper
2 1/2 pounds frozen green peas, thawed and drained
1 cup diced mild cheddar cheese
1/2 cup chopped bread and butter pickles
1/2 cup finely chopped onion
3 hard-boiled eggs, chopped
1 (12-ounce) can low-salt SPAM, diced
Lettuce leaves, if desired
• In a large bowl, combine the dressing, mustard, sugar and pepper. Add the peas, cheese, pickles and onion. Toss gently to mix. Add the eggs and SPAM and stir to combine. Cover and refrigerate until chilled, at least 2 hours. Serve on lettuce leaves if desired.
I find it hilarious that they specify the low-salt Spam. Why not Spam® Garlic? Or Spam® Oven Roasted Turkey? (Yes, that's a real product.) Or, really, Spam® Bacon, for the love of all things bacon-y? I say choose whichever Spam product you have on hand, and embrace it. Whatever you choose, the Miracle Whip and peas will make the salad amazingly homey and not just a little 1970s.
I don't know the last time I had a mild cheddar. I tend to go for the extra-sharp vintage cheddars that have some real bite to them. Say, for example, something from Tillamook, which is the cheese to beat all cheeses.
Tuesday, September 1, 2009
Sheboygan Is Fun To Say: Ethel Holbrook's Ham Loaf
So far, we've had a savory pie, a starchy pudding, and a jammy cake from The County Fair Cookbook...how about Sheboygan, Wisconsin? Just about 50 miles north of where Chefly Husband grew up, the Sheboygan County Fair isn't in Sheboygan proper, but rather in nearby Plymouth, WI. It's held Labor Day weekend, for five days, which means that this year, it starts this Thursday. If you're anywhere near, you can go to an ecumenical church service on Sunday, or a square dance, or you can just indulge in bratwurst done the right way.
The right way, of course, is to boil them in beer with onions, and then grill 'em. If you've never had a brat done right and done by a citizen of the Badger State, you're missing out, I can tell you that for free. They know their processed meat in Wisconsin. With that in mind, let's look at some processed meat!
Ethel Holbrook's Ham LoafIs it just me, or is it delightful to remember that "meat loaf" can use all sorts of meats, not just those coming from a cow? Odds are, you're not going to be able to find pre-ground ham at your grocery store. If you have the means, grind it at home; if not, chop it up in a food processor, or mince it really, really, really fine. Knife work is very therapeutic. Take out your stress on some ham!
"It's really my aunt's recipe," says Ethel.
Serves 6 to 8
1 egg
1 1/2 cups milk
3 slices white bread
1 pound ground beef
3/4 pound ground ham
3/4 pound ground pork
1 tablespoon salt, or to taste
Freshly ground pepper to taste
1/2 cup packed brown sugar
1 teaspoon dried mustard
1/2 cup pineapple juice
• Preheat the oven to 375 degrees.
1. Beat the egg and milk together; soak the bread in the mixture for 10 minutes or longer.
2. Combine the meats with the soaked bread, salt and pepper, mixing them well, but gently so as not to compress the meat. Put into a greased 9 x 5 x 3-inch loaf pan.
3. Make the topping. Mix the brown sugar, mustard and pineapple juice together. Spread this paste over the loaf. Bake 1 1/2 to 2 hours, until the top is brown and bubbling.
Perhaps the first time you make this, you'll want to try it in a loaf pan. However, I never, ever make meat loaf in a loaf pan. Ever. I like to cook it on a rack on a jelly roll pan, so that fat flows out more easily, and more of the surface gets brown and crisp and lovely. I'd also suggest that if you're going to bother to make meat loaf, especially one that requires you to do your own grinding, that you just double your batch, and make two.
There's nothing finer in this life than a meat loaf sandwich.
Since we've pig two ways, I'd be tempted to either line the pan (if using) with bacon strips, or top the loaves with bacon strips before saucing them up. Your mileage may vary, but when it comes to options, Take One Cookbook is very much in favor of exercising the bacon option early and often. Everything is better wrapped in bacon.
Now, you may take note of the two "to tastes" in the ingredients list, as well as the raw meat. How, you might wonder, are you supposed to do anything "to taste" if the frickin' meat you're seasoning is raw? Unless you want nasty evil disease, it won't "taste" until it's cooked!
...well, yeah. You're solution's right there. Take a pinch of the meat mixture, about the size of a filbert/hazelnut, smoosh it down into a wee patty, and fry it up in a hot pan on your stove. Then, taste it. Is it properly seasoned? If not, adjust. If so, onward! If you've exercised the bacon option, remember that it will likely bring a lot of salt to your mix, so don't over salt. If you do over salt, and you catch it in the tasting stage, add more stuff that isn't salt. More meat. More filler, if you must. Adjust, retest, retaste.
Have I waxed lyrical about my love of cheesy pineapple/brown sugar/ham pairings yet? Suffice to say, I love 'em, and will have to remember to take out one of the Trader Vic's recipe booklets at some point here. I'm pleased to see them come up in this dish, and would suggest that a pinch of ground cloves would be a welcome addition, based on how I spice up my p/bs/h dishes.
I don't want the vegetarians and anti-pig-eating folk to go away from this post empty handed, so I'll say this:
It's terribly fun to say "Sheboygan." Sheboygan, Shebogan, Sheboygan!
Monday, August 31, 2009
Listen To Your Big Sister: Kentucky Jam Cake
I take my cues from my big sister. Really, little sisters are advised to do that whenever possible -- big sisters being notoriously nasty and wicked things. In this case, however, I think the nasty wicked Kelly can be forgiven, because she said "Southern" and "Dessert" for today's post. So come along to Marion County Country Ham Days in Lebanon, Kentucky! For two days in late September, you can celebrate the local products, including, of course, ham, ham, and more ham. The County Fair CookbookKentucky Jam CakeReally, when I saw a recipe for a 4-layer cake, with three different kinds of jam, I was sure there'd be a different jam between each layer. Color me completely wrong! I was also going to wax lyrical about the absolute best blackberry jam in the world, and how you should use only that (but you can't, because my mom used to make it, and doesn't anymore), but then I grew to understand that all the jams are being combined.
Jam cakes are a Kentucky tradition. Obviously, this is a grand cake for a special occasion.
Makes 1 large (4-layer) cake
3 1/2 cups all-purpose flour
1/2 teaspoon salt
1 teaspoon ground allspice
1 teaspoon freshly grated nutmeg
1 teaspoon ground cloves
1 cup blackberry jam
1 cup strawberry jam
1 cup peach preserves
1/2 pound (2 sticks) unsalted butter, softened
2 1/2 cups sugar
6 egg yolks, lightly beaten
1 cup buttermilk
1 1/2 teaspoons baking soda
2/3 cup seedless raisins
1 cup chopped pecans
6 egg whites
Caramel icing (opposite page)
• Preheat the oven to 350 degrees.
1. Prepare four 8-inch cake pans: cut 4 rounds of parchment paper to fit the bottoms of the pans. Butter the pans liberally and position the parchment liners.
2. Sift together the flour, salt, allspice, nutmeg and cloves. Set aside. Push the blackberry and strawberry jams and peach preserves through a sieve into a bowl. Set aside.
3. In the large bowl of a heavy-duty mixer, cream the butter and sugar together until light and fluffy. Add the egg yolks and combine well.
4. Put the buttermilk in a 2-cup measure and stir in the baking soda.
5. With the mixer on low speed, add the flour and buttermilk mixtures alternately, beginning and ending with flour. Beat until batter is smooth. Stir in the jams, raisins and nuts.
6. Beat the egg whites until they form stiff, unwavering peaks. Scoop the whites over the batter and gently fold them in with a rubber spatula. Pour the batter into the baking pans, dividing it evenly and smoothing the tops with a spatula.
7. Bake in the middle of the oven 30 to 35 minutes, or until a toothpick inserted in the center comes out clean. Let cool 10 minutes on wire racks, then turn out on racks to cool completely. When completely cool, frost the cake with caramel icing.
Now, I like mixed fruit jams and jellies. (This is where I'd include a reference to being too tired and punchy in the Tastee Diner during college, and really raunchy things we used to say about mixed fruit jelly were I not so very, very tasteful.) I do. But I'm not taking the very best homemade anything and mixing it up willy nilly. So, use that which you have, as long as it passes muster when you eat it plain.
The caramel icing in question is a seven-minute frosting with light brown sugar, white sugar, cream of tartar, salt, and egg whites. If you're lacking a recipe and want this one, shout out and I'll post, or you could pick up a copy of The County Fair Cookbook
Sunday, August 30, 2009
The Great Raisin Divide: Creamy Rice Pudding
My sister suggested that I hit a different region for each recipe this week, and so today, we'll go to New England. The County Fair CookbookWhen I think of "pudding," I tend to think of instant Jell-o pudding. Take powder (chocolate or butterscotch, in my head), take cold milk, beat or shake for two minutes, eat. I have some bad memories of other puddings in hospital cafeterias...tapioca, bread, rice... Thankfully, all of these have been redeemed by eating them, you know, not in hospital cafeterias.
My Grandmother's Creamy Rice PuddingFirst of all, the salt is not optional. Salt makes things taste better, folks, and a small amount of salt in your dessert is going to make it taste lovely. It won't taste like a salt lick. It's half a teaspoon, for pity's sake. Use the salt.
Rose Robinson, Loretta [Greene]'s grandmother, lived on a small farm in South Paris, Maine. "This is the version as it's been passed down," says Loretta.
Serves 4
1 cup white rice
1 cup cold water
4 cups whole milk
1/2 cup sugar
1/2 teaspoon salt (optional)
1/2 cup raisins (optional)
Few drops lemon extract
1. Boil the rice and water until the water is absorbed.
2. Add the milk, sugar and salt, and the optional raisins. Simmer uncovered over low heat (or on the back of a wood-burning stove) until most of the milk is absorbed and the rice is tender. Stir in the lemon extract.
Here's where I'll lose some of you, here on the banks of the Great Raisin Divide. The raisins are not optional. Oh, sure, you could substitute some chopped up dried apricots or apples or dates, if you ran out of raisins, but you need the dried fruit in this to make it more than, well, milky rice without raisins. Raisins are nature's candy. Raisins are essential. You will miss it if you don't have the little bit of yielding chewiness.
I know, I know. Some of you hate raisins. I weep for the future, sometimes. But I stand by my beliefs, here on the proper side of the G.R.D. Just as I know the cheese is never optional, the raisins are never optional here at Take One Cookbook.
As for the wood stove reference, evidently Loretta cooks on a wood stove throughout the fair, in a display of old-time farm crafts, and also at home. Yes, by choice.
Saturday, August 29, 2009
The County Fair Cookbook, Lyn Stallworth & Rod Kennedy Jr.: Swiss Cabbage Pie
I was a 4Her from early on. It helps that my dad was an Extension agent, and helped get 4H going in our town; my sister is now the secretary for 4H in that same office. I was part of 4H sewing, cooking, forestry, photography, and rabbits...a lot of clubs! I went to 4H camp (which has mixed memories for me, especially as my first-ever high fever was at camp, and so there are some hallucinations wrapped up in my recollections of the senior counselors). The best part of 4H, though, was The Fair.Come the third week in August, life moved to Canby. Even before we had 4H projects of our own, we'd go and watch Dad judge the photography. Mom would talk about when she made cookies for her county fair, and ate so much dough she was ill. My sister and I showed our rabbits, had our sewing skills evaluated, demonstrated recipes, and once and a while even thought about going to see the rodeo.
To say I love my county fair -- and, yes, though I've been gone for 19 years, I still think of that as my fair -- is an understatement. So, when I got a happy reminder that, yes, I have a cookbook blog, it was easy to pick a seasonal choice: The County Fair Cookbook
Swiss Cabbage Pie
"When he was a kid on the ranch, my husband's grandmother took this down to the hayfield around two p.m. as an afternoon snack with coffee," says Ethel. "I collect cookbooks, and when we lived on a ranch I'd find a great-sounding recipe and realize I didn't have most of the ingredients called for. We were seventy-five miles from one town, and a hundred and fourteen miles from another. You learn to substitute. I've created a few new recipes out of necessity."
Serves 6 to 8
1 loaf unbaked bread (can use frozen purchased dough)
1 pound bacon
8 cups shredded cabbage
1/2 teaspoon salt
1/4 teaspoon pepper
3 eggs, beaten
1 1/2 cups cream or half-and-half
1/2 cup grated Swiss cheese (optional)
• Preheat the oven to 350 degrees.
1. Roll out the bread dough about 1/4 inch thick and place it in a 9-inch pie pan. Crimp the edges, as you would a pie.
2. Cut the bacon into small pieces and brown them in a large heavy pot. Pour off all but 1 tablespoon of the grease. Stir in the shredded cabbage and cook over moderate heat, stirring, for 1 minute.
3. Over low heat, add the salt and pepper, eggs, cream and the cheese, if you are using it. Cook for 3 to 4 minutes, stirring. Put the mixture in the crust and bake for 30 minutes, or until the filling is set and the edges are golden brown.
Remember, folks, that in my book, cheese is NEVER optional. Cheese is essential. Also, if you got frozen dough for this, please thaw it according to package directions before starting. Do not try to roll out frozen dough.
You could buy your cabbage pre-shredded in a bag, if you're not keen on deconstructing a head of cabbage on your own. But, as Mary Frances over at the Gluten(-)Free Cooking School shows, it's cheaper, tastier, and just more pleasant to do it yourself. Go on over to GFCS, and see how easy it is. Plus, as Mary Frances says, "After a long day, it’s sometime really fun to hack into a large vegetable with a big, long knife."
My copy of The County Fair Cookbook
Tuesday, June 9, 2009
Picnic Soup #2: Tomato and Buttermilk Soup

Tomato and Buttermilk SoupTwo ingredients! Just two! No cutting, no dicing, no blanching, no skinning, no skimming, no heating... it's simple, alright! Other than a glorious opportunity to stain things tomato red, this is something you could easily make with any kid old enough to stir the sugar and Kool-Aid packet in to the 2 quart pitcher.
2 cups (16 fl oz/500 ml) tomato juice
1 cup (8 fl oz/250 ml) buttermilk
This simple soup is cool and refreshing; if desired you can add some chopped tomato, cucumber, and fresh herbs. You can also vary the proportion of tomato juice to buttermilk.
Combine the tomato juice and buttermilk.
Serve Tomato and Buttermilk Soup chilled with open sandwiches, which become extra special when you make them with savory butters.
Variation: Combine buttermilk and apricot nectar for a refreshing drink.
Serves 2
Or was that just my childhood?
This soup shares a page with lots of savory butter suggestions. Pink peppercorn butter, which is "particularly good" with roast beef. Anchovy butter, for eggs, watercress, or cucumber. Herb butters. Walnut butter. If you can whir it up in a food processor, Outdoor Dining
Friday, June 5, 2009
Picnic Sandwich #2: Pan Bagnia
Pan BagniaThere is a new French bakery behind the building I work at, and they serve a lauded pan bagnia. We keep talking about going there for lunch. But, oh, how easy it is to put together these weighted sandwiches on your own!
6 tablespoons olive oil
4 large slices eggplant (aubergine)
16 French beans
4 bread rolls
8 teaspoons olive oil, extra
2 cloves garlic, finely chopped
parsley, finely chopped
1 red bell pepper (capsicum), cut into strips
12 black olives, pitted
16 slices prosciutto
1 purple (Spanish) onion, thinly sliced, optional
Heat 6 tablespoons of olive oil in a frying pan and fry the eggplant slices until golden brown on each side. Lift out and drain on paper towels.
Cook the beans in boiling water for 5 minutes. Drain.
Cut the bread rolls in half and brush the cut surfaces with extra olive oil.
Sprinkle the bottom half of each bread roll with the garlic and parsley, then add a slice of eggplant to each one. Divide the remaining ingredients, including the beans, between the bread rolls, then join the halves of the bread rolls together.
Wrap each bread roll securely in plastic (cling) wrap, then put all four under a heavy weight (such as a heavy bread board) for about 30 minutes.
Serves 4
Menu
Tomato and Buttermilk Soup (page 93)
Pan Bagnia
Fudge Brownies (page 43)
And weighted sandwiches are lovely. The juices mix, the sandwiches hold together well. You can make it without the prosciutto if you want to keep it vegetarian -- goodness knows there's a lot going on with the sandwich -- but I love the melting-on-your-tongue porky goodness the prosciutto brings. If you buy extra, you could always wrap some cantaloupe chunks with it, and serve it as part of a cheese course/dessert.
Chefly Husband has been known to do a version of this sandwich using a large loaf of bread. He calls it a Big Sandwich. I love it, but am charmed by the individual Not So Big nature of these. I'm also charmed with the idea of green beans on a sandwich. It's so very not what I ever did with green beans growing up. Were I to make these, I'd have to have extra beans on hand; our resident Corgi eats green beans with a passion.
Picnic Soup #1: Cold Avocado Soup
Cold Avocado SoupWhy is this soup not coming with me to the concert? Frankly, the idea of garnishing on site seems pointlessly fussy. I know, I could just serve the soup sans puree, but...you should see how lovely this soup looks in the picture. Pale green, with a rush of vivid red. It's gorgeous. The soup will have to wait for a time that I'm eating outside...but within steps of the kitchen.
2 avocados, halved and seeds removed
1 small white onion, chopped
2 cups (16 fl oz/500 ml) chicken stock
1 cup (8 fl oz/250 ml) buttermilk
salt and freshly ground black pepper
1 red bell pepper (capsicum), halved
1 teaspoon Tabasco sauce
A rich, cold soup is a lovely start to a summer picnic; it is easy to carry in a large glass jar or vacuum flask.
Scrape the avocado flesh into a food processor or blender. Add the onion and stock and process until smooth.
Pour into a container and stir in the buttermilk and salt and pepper to taste. Put aside until ready to serve.
Put the bell pepper under a broiler (griller) until the skin blackens. Transfer to a paper bag and leave for about 30 minutes. Scrape off the blackened skin. Put the bell pepper into a food processor or blender with the Tabasco and purée. Transfer to a small jar.
To serve, add a dollop of the bell pepper purée to each bowl of avocado soup.
Serves 4
Menu
Cold Avocado Soup
Scallop and Bell Pepper (Capsicum) Salad (page 83)
Cookies
Every single recipe in Outdoor Dining
I'm heading out of town for a wedding, so will be doubling up today, and when I return.
Thursday, June 4, 2009
Picnic Sandwich #1: Patafla
PataflaImportant to use a bread with a firm crust, or the whole thing will go too far into the soggy realm. If you are morally opposed to soggy bread, by the way, don't try this sandwich (even though, hey, a firm crust will do wonders here). There are those in my family who blanch at the idea of so much as dipping a grilled cheese sandwich into a bowl of tomato soup; thankfully, I can balance that out with the family members who love milk toast when feeling poorly.
4 tomatoes
1 large purple (Spanish) onion, finely copped
2 oz (60 g) capers
4 dill pickles (gherkins), finely chopped
2 oz (60 g) pitted black olives, chopped
4 oz (125 g) stuffed green olives, chopped
1 teaspoon chopped chili
1 long French loaf
olive oil
salt and freshly ground black pepper
This is a lovely Mediterranean picnic loaf -- make it the day before to allow the piquancy to develop.
Peel the tomatoes (make two small slits in the skin near the top of the tomatoes and drop into boiling water for about 30 seconds -- the skin will peel off easily). Cut the tomatoes into quarters and remove the seeds, then chop and put into a bowl. Combine with the onion, capers, dill pickles, black olives, green olives, and chili.
Cut the French loaf in half lengthwise and scrape out the soft bread inside. Add the soft bread to the other ingredients in the bowl and knead together, moistening with a little olive oil.
Add salt and black pepper to taste, then fill the two halves of the loaf with the mixture.
Press the halves together, then wrap tightly in plastic (cling) wrap and keep in the refrigerator overnight.
Cut into slices to serve.
Serves 6-8.
Menu
Patafla
Vitello Tonnato (page 99)
Cheese and Fruit
I think there's something very cozy about sandwiches for outdoor dining. You don't need utensils, assuming you sliced before heading out. You don't need plates, even, if you have a napkin you can eat over.
The balance of tomatoes and briny additions is great here, but if there's something you aren't very fond of (say, green olives, or capers), make it up by increasing the other items. I'd also feel free to substitute bread and butter pickles for the gherkins, if that's what you have in your fridge.
Wednesday, June 3, 2009
Outdoor Dining, Margaret O'Sullivan; Miniature Frittatas
I had to buy it.
And a good thing I am such a light touch for the marketers! This is a great cookbook; I've prepared lots of the dishes, and keep meaning to try more. They all turn out. They're all tasty. And, as we're officially in Summer (Observed) now that Memorial Day has passed, and I've my first outdoor concert of the season to go to next week, it seems time to take out this old favorite.
Miniature FrittatasI use a mini muffin tin when I make these; depending on your pan and how much stuff you stuff into your frittatas, your baking time will vary, so keep an eye on them. As the recipe suggests, these work with just about anything. Don't like goat cheese? Plop in some other cheese that does suit. Try cooked, peeled baby shrimp instead of the salmon. Whatever you have just a bit of left in the fridge is fair game.
4 oz (125 g) smoked salmon, finely chopped
3 oz (90 g) goat cheese, crumbled
fresh chives, chopped
6 eggs
1/4 cup (2 fl oz/60 ml) single (light) cream
These miniature frittatas make a great picnic starter -- serve them with chilled champagne. You can vary the fillings: chopped artichoke hearts, prosciutto, asparagus tips, Ratatouille (page 23), sautéed mushrooms or leek, or smoked salmon and goat cheese as combined here.
Grease a 12 cup cake (patty cake) pan. Divide the smoked salmon, goat cheese, and chives between the cups.
Lightly beat the eggs with the cream and pour into the cups.
Bake in a moderately hot oven (400°F/200°C/Gas Mark 6) for 8-10 minutes until golden brown.
Turn onto a cake cooler and serve at room temperature.
Serves 4-6
I tend to prefer dry-smoked smoked salmon to wet, so I go for some nice, thick, crumbly reminds-me-of-Oregon salmon as opposed to more elegant thin slices of fish. Use that which makes you happy.
I've made these for brunches -- they're a star of my traditional Thanksgiving parade-is-on-TV breakfast -- and for dinner parties. They're always a hit. The only time they've come close to failing is when I was working with an unfamiliar oven and insufficiently prepped my pans. Grease them well, folks.
Many of the recipes in Outdoor Dining
MenuOne could do worse.
Miniature Fritattas
Barbecued Double Lamb Cutlets with Ratatouille (page 23)
Honey Wafers (page 51)
In a quasi-related note, I evidently can't type "miniature" without first mistyping it as "minature."
Sunday, May 31, 2009
Cooking the Books: Bacardi Rum Cake
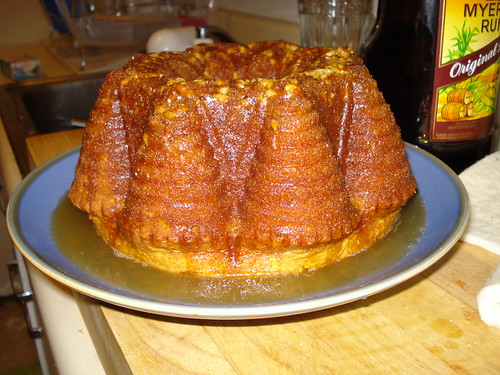
I said it was Cake Day, and Cake Day it is! I decided it was high time to make a Bacardi Rum Cake. I had all the ingredients in-house, including some lovely eggs from Washington's Green Grocer. Though I normally prefer to make a cake from scratch, I honored the original recipe and used a mix.
...Okay, I didn't honor it all the way...
I used half a cup of walnuts, not a full cup, and I'd feel free to omit them entirely if you have concerns about nut allergies (or if you don't know for absolutely sure that your cake audience is allergy-free).
I nabbed a box of cake mix that did have pudding included, and yet, rebel that I am, I added a box of pudding, used 4 eggs not 3, and had a full half cup of oil.
My oil was not Wesson.
My rum was not Bacardi.
And, believe it or no, I used a Bundt pan. I live in a 1937 apartment; my oven is TINY. As much as I love 9 x 13 inch pans, the narrower footprint of a Bundt just works better in my oven -- the heat can actually circulate.
The cake went together easy peasy. It filled the house with amazing scents. I had no problem getting the cake out (my Bundt is non-stick, and I buttered it liberally). And the glaze... well! I've never cooked a butter/sugar glaze before -- most cake glazes I do are water and confectioner's sugar. This took more time and stirring, but turned out beautifully. I poured it slowly over the cake, trying to let it all soak in, but there was still a pool of glaze when I was done -- you can see the pool in the picture above.
No worries. Just keep going back as it cools further, and use a spoon to, well, spoon the glaze from the pool over the cake. The glaze thickens as it cools; after a few times going back to lacquer the cake, there'll be nothing left to spoon.
The cake is gorgeous. It smells wonderful. And I can't wait to try it.
Cake Day!: Rhubarb Cake
 It's Cake Day here chez Take One Cookbook. I've got a Bacardi Rum Cake baking away in the oven as we speak, and the scent is heavenly; it's distracted me utterly from all things non-cake. So, let's delve for the last time into the Spratt/Bachman & Mellberg/McKenzie Family Cookbook 2008, and go for something seasonal and cakey from Aunt Agnes:
Rhubarb CakeGet the feeling that, in my family, one is just expected to know how the heck to bake? Let's break this down for the non-Spratts/Bachmans/Mellbergs/McKenzies out there:
Agnes Bachman Pengilly
1 1/2 c. packed brown sugar
1/2 c. butter
1 egg
1/2 tsp. salt
1 c. sour milk or buttermilk
1 tsp. soda
2 cups flour
2 cups rhubarb
Topping - 3/4 c. white sugar, 1 tsp. cinnamon. Put on top of cake. Bake 30-35 minutes.
Pan: Use a 9 x 13. Yes, I know.
Oven temp: 350°F
Method:
- Cream the butter and sugar together.
- Beat in eggs.
- In a separate bowl, sift together dry ingredients.
- Alternate adding flour mixture and sour milk or buttermilk to the butter/sugar/egg mixture.
- Toss the cut up rhubarb in a bit of flour (so that it disperses nicely in the cake, or so my mother always told me).
- Top as directed.
- Bake as directed.
- Cool in pan.
- Serve hunks of cake topped with Cool Whip, whipped cream, or, heck, warmed up in a bowl and then topped with ice cream or whole milk.
If you want to go the sour milk route, take 1 tablespoon of lemon juice or white vinegar, and put it in your 1 cup liquid measuring cup. Top off with enough milk to make 1 cup. Let stand for about 10 minutes, and voila! Soured milk. Don't just use milk that's past date in your fridge; you don't want spoiled milk. If this sounds too chemistry-class for you, just buy some buttermilk.
This cake is great warm, or at room temperature. It's, of course, a good dessert, but it's equally tasty for a homey breakfast. Go get a couple stalks of rhubarb (which is a vegetable, even though normally eaten as a fruit), and enjoy the tang.
Saturday, May 30, 2009
We'll Put Prunes In Anyting: Prune Pie
The one dish that says "Mom & Family" to me beyond all others is vinaterta, an Icelandic layered torte with stewed prunes between the layers. It's nice find out that the German side of her family also would put prunes in anything. From the Spratt/Bachman & Mellberg/McKenzie Family Cookbook 2008:Prune PieAnother recipe where you'd best know what the hell you're doing. Do you have a favorite pie crust recipe? Use it. Do you know what temperature your oven prefers for pies? Use it. And then we come to the prunes.
Magdalena Berger Bachman
Neva Spratt Bachman
1 c. prunes - cooked and pitted (1 lb.)
Beat well and add
1/2 c. cugar
2 eggs
1 tsp cinnamon
1/2 c. milk
dash salt
Put in crust and add strip top and bake.
Dried, or fresh? A quick internet check shows recipes using both (sometimes in the same pie). And, yes, I do call fresh prunes "prunes" -- Grandpa had a prune tree in his side yard. Regardless!
When in doubt about a family recipe, call on family. I gave my mom a call, and she was sort of surprised by my question. "Dried, of course! Why?" I explained about not wanting to lead anyone astray, and through a twisty conversation, she assured me that the Bachman family prune pie was really very very very good, and then secured a promise that I would make it for her when next we are together.
My grandma died when I was three; I don't have first-hand memories of her. But, oh, the stories. Everyone says she was the best pie maker ever. Grandpa had an entire lot devoted to gardening, and that which he grew, she canned, or froze, or baked into pies and cakes. The lot is gone now; when Grandpa and Grandma Fran moved into assisted living, the house was sold and the lots divided. A new, big house was built, and it's more than a little bit strange to know the garden's gone. I don't know if the prune tree remains.
Friday, May 29, 2009
Cooking the Books: Tangy Cucumbers
Some things in life seem so basic, so natural that to discover them writen down can come as a shock. "Wait, there's a recipe for that?" I cried, when I came across the basic natural it's-always-that-way cucumber dish in the Spratt/Bachman & Mellberg/McKenzie Family Cookbook 2008:Tangy Cucumbers"Seriously, a recipe?"
Betty Mellberg McKenzie
1/2 cup white vinegar
1/2 tsp salt
1/8 tsp pepper
Water
Slice cucumbers into a bowl. Add above and then put enough water to just cover the cucumbers. Keep in fridge. They get better the longer they sit.
But then, if this isn't the only way you were ever served cucumbers as a child, this is just the sort of thing you need. (No hyperbole there; it seems we always had a jar of these in the fridge, which is a neat trick, because I could eat all the cukes in one sitting without trying.) It is, indeed, tangy, as the title (and the vinegar) suggest. You could fancy it up by adding dried hot pepper flakes, or thinly sliced onions. I do not. You could use a food processor or mandoline to ensure uniform, nearly-transparent thin slices. I do not. And yesterday, Washington's Green Grocer brought me two cucumbers...
I scrubbed them, and realized they were still very waxy. Out came my trusty Oxo vegetable peeler

...and then I ate the top layer, with my fingers. Yes, it tastes better after it sits. But, yes, I could eat it right away. It took all my willpower to not tuck in with a fork, but... there's always tomorrow.
Thursday, May 28, 2009
Attractive To The Eye and Soothing To The Smell: Poppy Seed Buns
When Mom got the Spratt/Bachman & Mellberg/McKenzie Family Cookbook 2008, she wanted to know if it had "her" recipes, the ones she remembered her grandmother and aunts making. It's all well and good to have a new-to-you Rice Krispies Brownie recipe on hand, but what makes a family cookbook really sing is to find the recipes you wish you'd snagged from your aunt's recipe box the last time you swung through North Dakota. Mom was very happy to find that the sweet poppy seed buns were included. Poppy Seed BunsWow, we went from a standardized recipe to one a bit more ... trusting. Assume a 350°F oven, and think either "cinnamon roll" or "knish" when shaping your buns. Yes, I know they're different shapes, but either should yield good results. Personally, I'd go with "cinnamon roll" so that I get well distributed bits of bread and filling with every bite.
Magdalena Berger Bachman
Dough:
2 cups warm milk
1/2 c. sugar
2 tsp. salt
2 cakes (pgks) yeast
2 eggs
1/2 c. soft shortening
7 - 7 1/2 c. flour
Dissolve yeast in 1/2 c. warm water. Mix well the milk, sugar and salt together with yeast. Add eggs and shortening. Add flour. Let rise. Punch down. Let rise again.
Filling:
Poppy seeds, raisins thickened with water and cornstarch. Add some sugar. Place small amount on circular shape of dough. Roll. Let rise. Bake.
If you have a poppy seed grinder handy, by all means, grind those seeds! You could, of course, also buy pre-ground poppy seeds. The texture is lovely, and odds are, you don't have your own poppy seed grinder sitting about.
I know some folks are anti-raisin; feel free to substitute a dried fruit of your choice. Dates, apricots, or even apples would make a good substitution.
As for the sugar, add to taste -- I'm thinking a 1/4 cup is a good starting point. Mix up your filling, taste it, and add sugar if you think you need it.

I'm really liking digging through family food history; my grandfather passed away last month, and this is a ...non-maudlin... way to remember him and his. Speaking of his, the stern looking couple above are my great great grandparents, so were his grandparents (I have to double check if that makes this Magdalena-of-this-recipe, or Magdalena's mother-in-law). If any of the recipes in this book don't work out, well...we can probably pin the blame on them or their children. This will become important when I post the prune pie recipe.
Wednesday, May 27, 2009
Why, Yes, We Are From North Dakota: Knephla Soup
One thing you should know: I come from North Dakotan, German-by-way-of-Russia folk. My family left the Alsace, moved to Russia, and then left Russia for the wilds of the North American Midwest. (Well, the part of the family that didn't come over from Iceland at about the same time. Or Ireland fifty or so years before that. Or, you know, England, pre-Revolution -- yes, I could join the D.A.R.) Anyway, the Germany/North Dakota connection shines through in a lot of the Spratt/Bachman & Mellberg/McKenzie Family Cookbook 2008 recipes. Take the North Dakotan soup:Knephla SoupAaaah, farm food! Hearty, cheap, easy to make in large quantities. I'd eschew the bouillon, and just use 4 quarts of good chicken stock. I'm torn between calling the knephla (spelled elsewhere as knoephla) "dumplings" or "spaetzle" or "gnocchi," but whatever you call 'em, they're going to be tasty little blobs of carby goodness, and I'd wager they'd make you feel better when you're recovering from a cold.
Anthony Bachman
4 qts water
1/4 cup + 1 T. chicken bouillon
5 med. Potatoes
1 c. dice Carrots
1 c. diced ham
1 small onion
2 bay leaves
Simmer until potatoes and carrots are soft
Knephla
2 c. flour
1 egg
1 t. salt
1 t. baking powder
1/4 c. milk or enough to make a soft dough
Mix knephla dough together with a fork and add enough milk to make a soft dough. Roll into a quarter inch rope and snip off with kitchen shears or knife. Drop into soup and cook for 10 to 15 minutes.
Knephla seems to come from the German word "knopf," which means button, or knob. So, wee knobby buttons, in your soup -- an interesting image. Though some recipes call for adding milk or cream to the broth, you're going to get some creaminess from the knephla themselves -- the flour will thicken the surrounding broth somewhat. I'm tempted to throw in a hearty knob of butter to enrich the soup, myself, and if I did feel a need for more dairy, I'd go to the Irish side of my family, and open a can of evaporate milk to pour in -- it's a staple for our family's potato soup.
The Germans from Russia Heritage Collection in Fargo, N.D., has a great foodways section with links to cookbooks for sale, recipes, and articles on food culture in the German-by-way-of-Russia community. Check it out, especially if you want to see other ways to make knoephla/knephla.
Tuesday, May 26, 2009
Reuben Was The Eldest Of The Children Of Israel: Reuben Dip
First things first: there's a revision to German Twists. We've a better method, a more-complete ingredient list, and, well, a repudiation of the idea that "German Twist" and "Cinnamon Twist" are really the same thing. Most of the recipes in the Spratt/Bachman & Mellberg/McKenzie Family Cookbook 2008 are from my mom's generation, her mom's generation, or her grandmother's generation. There are some, though, from "the kids." This is one of those:
Reuben DipI'll admit it: I adore sauerkraut. It's so darned tasty! Every once and a while, I'll make a dinner out of rye cocktail bread, smeared with Russian dressing, topped with pastrami, sauerkraut, and a sprinkling of cheese (mini-Reubens, yay!). I even tried to make my own 'kraut once, cutting and salting and curing pounds and pounds of cabbage in a big ceramic crock. If you're not a fan of the 'kraut, this may well not be the recipe for you.
Michelle Bachman
1 8 oz. pkg. cream cheese, softened
1 cup sour cream
1 16 oz. can sauerkraut, drained
1 5 oz. jar dried beef, chopped
Soften cheese and add rest of ingredients. Serve warm with crackers.
For the rest of you... dang! Doesn't this sound like a tasty dish to bring to a potluck? Or something to have on hand for a rainy night in front of the TV with some beer, friends, and old movies? I wish there were some sort of tomato in the dish to stand in for the Russian dressing (and give it some color), but it sounds good as is, too.
And it sounds like something almost everyone in my family would wolf down without regret.
Monday, May 25, 2009
Spratt/Bachman & Mellberg/McKenzie Family Cookbook 2008: German Twists
When I was a kid, every summer we'd have a big family picnic. My mom's one of 7 kids, and her parents were each one of several, and there were cousins, aunts, uncles, third cousins twice removed, kids, ancients, games, silliness, and fabulous food. The picnic sort of fell into memory when my generation hit their 20s, but now that we're older and have families of our own, it's come back with a vengeance. At the 2008 picnic, there were even representatives from the heartland -- North Dakota, where both Grandma and Grandpa came from. These relations brought with them a fabulous surprise: a family cookbook. The Spratt/Bachman & Mellberg/McKenzie Family Cookbook 2008, to be precise. Lots of family recipes, some of which I remember from picnics, some of which Mom remembers from visiting the family farm as a little girl. There's also stories, some of which made Mom laugh outloud. This week, we'll delve into the family. First, a note from the compiler:The cover of this cookbook was a special find, thanks to Marjorie Pengilly Mostad for bringing it to our attention. It is taken from an actual Betty Crocker magazine with Grandpa Andrew Bachman's address on the address label, and a hand written note explaining that these twists were made by Grandma Bachman. I don't remember ever eating the twists, but the recipe is in this book, and I am told they were delicious.Well, the compiler may never have had 'em, but my mom remembers them well. The good folk at Betty Crocker may have called them Cinnamon Twists, but along the way, the name changed.
German Twists (Cover Photo)I'm sure this tastes just fine. I'm not sure where the heck the sugar comes from, nor how this is supposed to be a cinnamon twist when there's no cinnamon. Frankly, I think there's missing information between "dough" and "sprinkle," and I'm going to go out on a limb and say that the sugar in question is cinnamon sugar. There was always cinnamon sugar about the house as I was growing up, so I'm guessing that a common enough thing in our family. I think that if you want to try this out, you're going to have to be patient as all heck with it, and/or find some other instructions for yeast-raised pastry dough and use them as a crib sheet. Try it. What the heck. Worst thing that happens is you have just okay pastry as opposed to stellar pastry.
Magdalena Berger Bachman
1 c. lard or butter
1 c. sour cream
1 cake yeast
2 beaten eggs
3-1/2 c. flour
dash of salt
Mix shortening and flour until crumbly. Beat eggs, add cream and yeast. Add to flour mixtures and knead a little. Put in fridge overnight with wet cloth on top. Take little pieces (about handful) of dough sprinkle board with sugar and put some on top of dough. Roll out and then fold over and over until dough is small. Put more sugar on board and on top of dough as you roll. Cut in strips 1 inch wide and 3 or 4 inches long. Twist and put on greased pan. Bake until real light brown at 375 degrees. Very good and flaky.
AMENDMENT:
Whatever this recipe is, it is not the cinnamon twist on the front of the cookbook. Here's another German Twist recipe, from the glorious internet, such that you can see how it should actually be rolled and handled:
GERMAN SOUR CREAM TWISTSThere are TONS of recipes out there for German Sour Cream Twists, and clearly, that's what Magdalena Bachman's recipe is for. Don't use cinnamon sugar (or, heck, do, but know you'll be concocting a different sort of beast). And plan on a whole cup of sugar for your rolling and twisting.
3 1/2 c. flour
1 tsp. salt
1 c. shortening (part butter)
1 pkg. yeast
1/4 c. warm water
3/4 c. sour cream
1 whole egg and 2 egg yolks, well beaten
1 tsp. vanilla
Refrigerate 2 hours. Using half of dough, roll into 8x16 inch rectangle. Sprinkle with sugar and fold each end into the middle and roll out again in rectangle and sprinkle with sugar. Do this 3 times using 1/2 cup sugar for each half.
After the third time, roll out in a rectangle and cut in 1x4 inch strips and twist. Bake at 375 degrees for 15 minutes. Makes about 5 dozen.
Sunday, May 24, 2009
Craving Flaky Sandwiches: Nutty Sweet Potato Biscuits
 Wrapping up a week of recipes from The Fruit of the Spirit: 100th Anniversary of Bittinger Lutheran Parish, we turn to the one recipe that my friend Heather had dog-eared herself before showing me the book.
Nutty Sweet Potato BiscuitsYes, the same Opal Fazenbaker as gave us the "That's It Salad". I suspect if ever you are invited to lunch or dinner at the Fazenbakers, you're in for a heck of a meal.
Opal Fazenbaker
2 3/4 c. all-purpose flour
4 tsp. baking powder
1 1/4 tsp. salt
1/2 tsp. ground cinnamon
1/2 tsp. ground nutmeg
3/4 c. chopped nuts
2 c. mashed sweet potatoes
3/4 c. sugar
1/2 c. butter or margarine, melted
1 tsp. vanilla extract
In a large mixing bowl, combine flour, baking powder, salt, cinnamon, nutmeg and nuts. In another bowl, combine sweet potatoes, sugar, butter and vanilla; add to flour mixture and mix well. Turn onto a lightly floured surface; knead slightly. Roll dough to 1/2-inch thickness. Cut with a 2 1/2-inch biscuit cutter and place on lightly greased baking sheets. Bake at 450° for 12 minutes, or until golden brown.
Use leftover mashed up sweet potatoes, or if you're cooking strictly to make these biscuits, cook up your taters the night before; you want cold (or at least room temperature) mash to make these biscuits. And, for the love of all things holy, ignore the "margarine" option. There is no margarine option here. Use butter. If you can not bring yourself to use butter, use lard. Margarine has no place here. If you can not use animal products, still, please, don't use margarine. Use some vegetable shortening. Margarine is not going to give you the flaky soft texture you want here.
I read this recipe and think, "Damn, I want a sandwich!" I want to pull a biscuit apart, slather it with chicken curry salad, wrap a paper towel around it and run outside to eat it in the soft green grass. With a crisp white wine. Or a beer.
Oh, yes. These would be fine on a holiday buffet (choose your holiday...Easter ham, Christmas or Thanksgiving turkey, Valentine's Day sweet cream butter). They'd be great with a good lashing of Branston pickle and a crumbling of cheddar. They'd be out of this world as the base for a peanut butter and jelly sandwich.
...I really need to bake. Soon.
Subscribe to:
Posts (Atom)