Showing posts with label dessert. Show all posts

Monday, January 6, 2014

Key Lime Pie: When It's Too Hot To Turn On The Oven, But You Need Dessert

So, I'm going to a dinner party tonight, and was asked to bring dessert. It's hotter than fuck out there, and sticky, and gross, and I really don't want to turn on the oven. The last time I supped with this group, I also brought dessert, and that, friends, was my near-famous strawberry shortcake with thyme and balsamic vinegar. Mmm. Mmm, yes, but it ruled out another shortcake option (which, face it, is one of the best options in this nasty-assed weather).

So, what to do? By the time I thought of a puff pastry tart, it was too late to buy and defrost puff pastry. (Note to self: buy puff pastry, put in freezer for just such an occasion.) (Additional note to self: you're 39 years old -- shouldn't you be able to type "occasion" properly the first time 'round?)

Long story short (too late), it came down to a chocolate ganache pie (only heat required: microwave for melting chocolate and butter, as long as you use a pre-done crumb crust), or the ultimate in no-bake goodness: Key Lime Pie.

And Key Lime Pie won the day. 2 crumb crusts, 4 egg yolks, 2 cans sweetened condensed milk, and a scant cup of key lime juice. Plus obscene amounts of whisking. No, really. Right now, I'm sitting barely clad right under the a/c because I'm sweating like a pig would sweat if a pig could sweat which they can't. I'm just saying. If offered a wallow, I'd consider saying "yes."

Anywho. I now have two pies setting up in the fridge. I'm not going to top it off with meringue, because, again, see the "no oven, damn it" stance of hot weather cookery. I will likely pick up some whipping cream on the way to the dinner, just because there's extra head room on the pies, and I like a pie that looks ample, not accommodating.

You're thinking to yourself at this point "Um....are those egg yolks raw?" Well...only as raw as the scallops in your ceviche are raw. The acid in the lime juice denatures the proteins in the eggs, "cooking" 'em. If you've a compromised immune system, you might want to shy away from this, but if you're okay with sushi or ceviche or delicious unpasteurized cheeses, you should be fine with this authentic tasty pie.

Scaled down version of the recipe (for those rare occasions where one pie is deemed enough):
Key Lime Pie
Based on bits and pieces of far too many recipes

2 egg yolks
1 14-oz can of sweetened condensed milk
1/4-1/2 cup key lime juice
1 9" graham cracker crumb crust pie shell

If you have a hand mixer, this'd be a good time to use it. Otherwise, this is a good recipe to work out your whisking arms. Whisk the egg yolks until they are very, very pale yellow and frothy. Add in the sweetened condensed milk, and whisk, whisk, whisk, whisk. You want to keep whisking until it is getting noticeably thickened -- when you pick the whisk up out of the goo, it should come off the whisk in sheets, not in drips. So, whisk some more. If you're using electrics, this'll be at about the 4 minute mark. If you're going by hand, it'll be longer. Whisk away, baby. On a really hot day, you might want to make sure you're sitting under an air conditioner, so you can stay cool.

Once your goo is thick, add in 1/4 cup of key lime juice (preferably fresh, but if your choice is between fresh NON-key limes or bottled key lime juice, go for the bottled). Stir, stir, stir until it's well incorporated. Then, dip your very clean pinky tip into the goo, and taste. Is it tart enough? Is it lime-y enough? If not, add more lime juice, up to another 1/4 cup (so, up to 1/2 cup total. No more, or I won't vouch for the setting-up-ability of the pie).

Pour into a prepared crumb crust, scraping all the gooey goodness out of the bowl and into the pie. Place gently in your fridge, and let it sit there for a good 4 hours before serving.

Garnishing options:
  • grated fresh lime zest
  • candied lime peel
  • fresh lime wheels
  • little dabs of whipped cream
  • great big globs of whipped cream
  • more Cool Whip than might strictly be considered healthy
  • meringue made from those 2 egg whites you have left over from separating out your yolks for this recipe (note: this would require turning on the oven)
You could use a ginger snap crust, if you want a ginger-lime pie. You could use a chocolate crumb crust for a black-bottom key lime pie. You could do away with crust completely and just let the goo set up in wee ramekins or custard dishes. I won't judge.

Friday, December 2, 2011

Questionably Elegant Hostess Gifts; Cuban Diplomatic Bread Pudding

Hunger No MoreToday's recipe from Hunger No More: Food & Fellowship from the Episcopal Diocese of Washington is a great Washington sort of recipe. It didn't originate here, and it is all about places that you've probably never been, yet it wraps the familiar and mundane in so that it seems all sorts of...normal. Nothing could be more normal and dull than canned fruit cocktail, right?

Cuban Diplomatic Bread Pudding
International: Cuban

1/2 loaf of fresh Ciabatta bread (any bread without a hard crust), cut into small pieces
2 cups sugar
2 cups milk
4 Tbsp butter
4 eggs
2 Tbsp Grand Marnier
1/4 tsp ground cinnamon
1 pinch nutmeg
1 tsp vanilla extract
1/2 tsp almond extract
1/4 tsp of salt
1 cup canned fruit cocktail, drained

Preheat oven to 350F. Caramelize 1 cup of sugar in a shallow 9 inch square baking pan. Tip pan to cover sides, until sugar turns light amber brown. Do not let the sugar foam.

Pre-soak the bread slices in milk. Puree in blender and reserve. Combine the eggs, Grand Marnier, cinnamon, nutmeg, vanilla, almond extract, and salt. Puree in blender and reserve. Pulse 1 cup of sugar with butter in the blender, and combine with egg mixture and puree. Combine with bread and milk mixture.

Put the fruit cocktail in the caramelized baking pan. Pour the batter in the pan. Place the pan in a large glass pan (Pyrex), pour hot water in the large glass pan halfway up the sides of the baking pan. (I prefer a large glass pan as you can monitor the water level from the oven door.) Place the pan in the oven, and bake the pudding for approximately 2 hours. Do not allow the water level to reach the bottom of the pan. You can tell it's done when a knife inserted in the center comes out clean.

Remove the pudding from the oven and allow it to cool on a wire rack. Turn the cooled pudding upside down onto a serving plate and refrigerate before serving.

Serves 10.

This recipe goes along with one of my favorite stories my grandmother used to tell when she made it. In her days in Cuba, a can of fruit cocktail was the most elegant hostess gift; not available in Cuba, it meant you had American connections. This dessert has become my father-in-law's favorite.

Ivonne Burgess
Christ Church, Durham

I'll admit it: I question the elegance of a can of fruit cocktail as a hostess gift. Though, hey, there have been times in my life where a can of Spaghettios would have been seen as a very clever and thoughtful gift indeed... I'll ponder this further.

I love a good bread pudding. They're highly adaptable creatures, and I'd be tempted when tinkering with this dish to do away with the water bath. Yes, yes, it makes the custard set up all smooth and perfect, but we threw caution to the wind over Thanksgiving and did cheesecakes sans water baths, and I'm feeling like tweaking the cooking gods' noses again. Nerds to the water bath!

Consider switching up the fruit here, unless you're making it for an elderly Cuban expat who will recall the fruit cocktail elegance with fondness. I'm thinking that a can of cling peaches would be good here. I imagine it would work with any canned-in-syrup fruit.

Christ Church makes St. Alban's look like a toddler. It was founded in 1661. Not a typo. It came in to being when Charles II was king in England. That, friends, is a very long time ago.

Sunday, September 11, 2011

Blueberry & Blackberry Boy Bait: Cooking the Books


It's September 11, 2011, and I celebrated the second day of being in a Toxic-Free Zone (TFZ), media-wise. I invited a friend over for movies, made up a big super nacho, and, because nothing makes a TFZ quite like the scent of baked goods, I baked.

Specifically, I baked a Boy Bait...with variations from the original recipe (I know you're all terribly surprised).

Variations:
  • I used blueberries and blackberries.
  • I used a whole lot more blueberries than called for -- a whole big pint container, not just one cup.
  • Yes, and then blackberries in addition to that...a 4 oz package.
  • I didn't use nutmeg, because, well, I found out I didn't have any nutmeg in the house.
  • I did have cinnamon, though.
  • I ran out of sugar -- what sort of baker am I? -- so filled out the "sprinkle on top" sugar measure with cinnamon sugar.
I recommend upping the amount of fruit like I did. Otherwise, you're having much more cake than fruit. This gives you a good duality. And, yes, I said "cake" -- it's much more cakey than a clafoutis or any crumble, crumb, or whatnot.

The recipe came together just fine. A survey of other boy bait recipes online show that others are way more complicated, with whipping of egg whites and folding in of same, and cutting cold butter into flour... this is easier.

In the original post, I talked about how I liked how the ingredients list was ordered. Well...I take it back. The first measure of sugar, the butter, and the eggs should be together, at the top of the list, and then the dry, then the milk, then the toppings. So sayeth me.

I would serve this slightly warm with ice cream, or completely cooled with whipped cream or Cool Whip. I didn't, though, and it was just a touch on the too-dry side...and that was with the extra fruit!

Wednesday, August 31, 2011

Chocolate Truffles with Kahlua and Pecans: This Is a Keeper

A Little SomethingWe've been savory for far too long here on Take One Cookbook... (Yes, I'm conveniently forgetting the week of Jell-O.) It's time for something decadent, something sweet from A Little Something to help you roll into the holiday weekend.

And, really, when you're looking for decadent and sweet, nothing fits the bill quite so nicely as a boozy homemade truffle. They are really, really, really easy to make, but you don't have to let anyone know that. Just like in that old Rice Krispies commercial where the mom makes a big deal about making rice cereal marshmallow treats and the family believes that they were the hardest thing to make in the world, the ultimate expression of maternal love.

No offense meant to said marshmallow cereal squares -- they really are darned tasty. Heck, I had an R.A. back at American University who was completely mystified by my ability to crank out Rice Krispie Treats.

He'd be gobsmacked by today's recipe -- you, too, can leave people dumbfounded.
Chocolate Truffles with Kalua and Pecans
These elegant chocolates are a perfect accompaniment to your favorite coffee or espresso. 
Makes 25
3/4 cup whipping cream
1 1/2 cups (12 ounces) semisweet chocolate bars, finely chopped
2 tablespoons Kahlua
1 1/4 cups finely chopped pecans
  1. Line an 8-inch-square baking pan with foil. Set aside.
  2. Bring the cream to a simmer, remove from the heat, and whisk in the chocolate until smooth and melted.
  3. Whisk in the Kahlua. Pour the mixture into the prepared pan and freeze about 30 minutes, until just firm.
  4. Cut the chocolate into 25 squares. Pour the nuts into a small bowl. Coat each square with nuts and roll into a ball.
  5. Place the chocolates on a small baking sheet and chill until firm, at least 2 hours. Serve cold.
Try some of these combinations:
  • Substitute Grand Marnier for the Kahlua.
  • Substitute almonds or hazelnuts for the pecans.

If you made up a batch of kaluha a few weeks back, you can certainly use it here.

You also don't have to step near the stove. Really! Heat up that cream in the microwave, and you'll have an easier time all around. Don't even think of touching a double boiler.

If you're sharing these with people who might have nut allergies, for the love of all things, do not put nuts in your truffles. You can replace the nuts with crushed vanilla wafers, or even some puffed rice cereal. If you go the Krispie route, I'd recommend melting up some more chocolate in the microwave so that you can coat the truffles and make them extra pretty.

Friday, August 26, 2011

Fantastic Fruit Bars: Improvisational Cookery

Amazing Magical Jell-O RecipesWe can't end our week with Amazing Magical Jell-o Desserts without having at least one -rated recipe "for children with more cooking skills." The fine folk at General Foods seem to think that more cooking skills translates into better improvisational choices, so there's more freedom in this recipe than the others we've looked at.

This freedom might come in handy this weekend, if you're on the East Coast of the U.S., and stuck inside waiting out Hurricane Irene -- you can mix up flavors to suit your tastes and your pantry supplies. Of course, if you're still standing in line at the grocery store, you could ask the nice person behind you to watch your cart while you run to get the ingredients, and then you can plan a little more specifically.

★ Fantastic Fruit Bars

THESE GO IN:
1 cup graham cracker or vanilla wafer crumbs
1/4 cup melted butter or margarine
2 packages (3 oz. each) Jell-O brand orange, lemon or peach flavor gelatin*
1 cup boiling water
1/2 cup light corn syrup
1 cup chopped dried apricots or prunes or chopped mixed dried fruits*
1 teaspoon grated lemon or orange rind (optional)*

GET THESE READY:
1-cup dry measure
1-cup liquid measure
small saucepan
medium bowl
measuring spoons
9-inch square pan
small knife

HOW TO MAKE IT:
  1. Combine crumbs and melted butter; sprinkle 1/2 cup ccrumb mixture over bottom of a 9-inch square pan.
  2. Dissolve gelatin in boiling water.
  3. Stir in corn syrup, fruit and rind. Chill until slightly thickened.
  4. Pour into pan over crumbs; sprinkle with remaining crumbs. Chill until firm, about 3 hours.
  5. Cut into bars; store in refrigerator. (Bars hold well at room temperature for several hours.) Makes 20 confections.
*Suggested combinations: Orange flavor gelatin with apricots and orange rind. Lemon flavor gelatin with prunes and lemon rind. Peach flavor gelatin with mixed fruit; omit rind.
They're not coddling kids here: they recommend prunes. Prunes! Instead of raisins! You could use raisins. Or sultanas. Or Craisins. Or...any other dried fruit. Dried blueberries with Berry Blue Jell-O -- why not! Okay, other than my firm belief that food is not nor should it be blue. Regardless, we have a lot more flavor options in the gelatin world these days than we did back in the 70s, so branch out. If the idea of finding a flavor on a cookie tray doesn't make you hurl, try it here.

If I were writing this recipe, I'd change the order of the HOW TO MAKE IT so that you'd do step 2, step 3, and then step 1 -- there's no need for you to make the crust before making the gelatin, and you're going to have some time to twiddle your thumbs as the gelatin thickens slightly. This thumb twiddling time is the perfect time to throw a sleeve of graham crackers in a heavy duty zip top bag and start bashing the crap out of it.

It is entirely acceptable to use pre-crushed, comes-in-a-box-as-crumbs graham cracker crumbs. It is easier to measure, as there's no guess work as to how many crackers you'd need to whack. (We're full service here: 14 graham crackers make a cup of crumbs. You're welcome.) I do have a box of said crumbs on my shelf, in case I get a hankering to make a seven layer cookie. No shame.

Stay safe, folks. It's going to be a heck of a weekend, weather-wise. We'll be back with a new cookbook tomorrow.

Thursday, August 25, 2011

Dazzling Easter Eggs: Doing It Old School

Amazing Magical Jell-O RecipesWhen I was a kid, we had finger Jell-O -- Jell-O and Knox gelatin in a 9x13 pan, that you could slice and eat, well, with your fingers. Years later, Jell-O started marketing Jell-o Jigglers which, if I understand correctly, involved just less water and no extra gelatin. I'm sure my mom's way is best, but I did think the Jigglers approach had one thing going for it: a related proliferation of egg-shaped molds, so you could have Jell-O Easter eggs. Amazing Magical Jell-o Desserts has a more old-school approach to the task.
♦ Dazzling Easter Eggs

THESE GO IN:
8 eggs
1 package (3 oz.) Jell-O brand gelatin, any flavor
1 cup boiling water
1/2 cup milk

GET THESE READY:
skewer or cake tester
mixing bowl
wire whip or fork
1-cup liquid measure
mixing spoon

HOW TO MAKE IT:
  1. Using a skewer or cake tester, make a 1/2-inch hole in one end of each egg shell. Shake eggs out of shells, reserving 1 egg. (Use remaining eggs at another time.)
  2. Rinse shells thoroughly with cold water and place in an egg carton.
  3. Beat reserved egg slightly; blend in gelatin. Add boiling water and stir until gelatin is dissolved.
  4. Add milk and pour carefully into egg shells. Chill until firm, about 4 hours.
  5. Crack shells slightly, dip quickly in warm water and peel off shells.
  6. Arrange "eggs" in nests of green-tinted Baker's Angel Flake coconut, if desired. Makes 8 "eggs" or 4 servings.
Darned tootin'.

Do not fear the raw egg -- when you add in the boiling water, you're cooking the egg enough to take care of any oddness. The egg shell, however, might still have oddness. If you've a delicate system for any reason, you'll want to sterilize the shells. You could boil them. I'm fairly certain you could bake them. And, according to the internet, microwaving might also do the trick. Me, I like to live on the edge, and would use 'em rinsed with cold water.

Pour the boiling water in slowly, and stir the whole time, or you're risk scrambling the eggs.

I'm charmed by the last point of the list. The eggs are "eggs," but the nest is just a nest, even though I've yet to see any creature make a bed or a home out of flaked coconut, green tint or no. Though, the idea has delicious potential.

Wednesday, August 24, 2011

Halloween Pie: No Bake Pumpkin Pie -- Really!

Amazing Magical Jell-O RecipesMy nephew out in Oregon -- Jamie -- is a big, big fan of pumpkin pie. When it comes to his birthday, he requests a "pumpkin pie cake"...in March! Now, I'm always happy to bake a pumpkin pie, but I understand that some people freak out at the thought of baking, especially custard pies, so I appreciate that there may be call for a no-bake option. Today's recipe from Amazing Magical Jell-o Desserts is about as simple a no-bake pie as you (or your older children) can get.
♦ Halloween Pie

THESE GO IN:
1 package (6-serving size) Jell-O brand vanilla flavor instant pudding and pie filling
1 can (16 oz.) pumpkin
1 cup cold milk
1/2 teaspoon ground nutmeg*
1/2 teaspoon ground ginger*
1/2 teaspoon ground cinnamon*
1 baked 9-inch graham cracker crumb crust, cooled
1 container (4 1/2 oz.) Birds Eye Cool whip non-dairy whipped topping, thawed

* Or use 1 teaspoon pumpkin pie spice.

GET THESE READY:
9-inch pie plate
mixing bowl
mixing spoon
electric mixer or hand beater
1-cup liquid measure
1-cup dry measure
measuring spoons
wax paper
metal spatula

HOW TO MAKE IT:
  1. Combine pie filling mix, pumpkin, milk, and spices in bowl.
  2. Mix slowly with electric mixer or hand beater just until blended, about 1 minute.
  3. Fold in 1 cup of the whipped topping.
  4. Spoon into pie shell. Chill until set, at least 2 hours.
  5. Garnish with remaining whipped topping. (To make "face," cut pieces of wax paper in shape of eyes, nose and mouth and place on pie filling. Spread whipped topping around papers; then remove papers. Garnish with candy corn to resemble teeth.)
Buy a pre-made crumb crust and you're in no-bake land. I really want you to think about getting a gingersnap crumb crust. Or a chocolate one. Oh, yes.

I'm trying to puzzle out the call for a 1-cup dry measure -- my best guess is they want you to treat the Cool Whip as a dry ingredient, which seems more than a bit strange to me, but you know what? Your wet measure is dirty from the milk, so might as well use another measuring cup for the Cool Whip. Go for it.

This cookbook is so precise about listing out every little thing you might need that I find it odd that they don't list out candy corn in the "These Go In" list. Of course, you could just have your mouth stencil have teeth on it...

Do I have to point out here that you should use straight canned pumpkin, and not canned pumpkin pie filling? Don't use that canned pumpkin pie filling. Ever. You can spice your own darned pumpkin, boys and girls. You can.

Tuesday, August 23, 2011

Banana Wobbler: Everything Else Is Shaking, So Why Not?

Favorite Recipes from Caldwell, IdahoGreat googly moogly, we had an earthquake here today! For those of you not familiar with the mid-Atlantic region of the US, DC is a couple hour's drive away from the epicenter. There was some (thankfully limited) damage to the National Cathedral up the road, but everything chez nous is safe and content. That being said, I had to change up my Amazing Magical Jell-o Desserts plans a bit to reference the incredibly out of the norm occurrence -- no matter if the world rumbles or no, Jell-O will jiggle and wobble.

♦ Banana Wobbler

THESE GO IN:
1 package (3 oz.) Jell-O brand gelatin, any flavor
1 cup boiling water
1/2 cup cold water
2 medium bananas, cut in half
Lemon juice
Shoestring licorice

GET THESE READY:
3 empty 6-ounce juice cans
mixing bowl
1-cup liquid measure
mixing spoon
paring knife

HOW TO MAKE IT:
  1. Dissolve gelatin in boiling water. Add cold water and chill until thickened.
  2. Place a spoonful of gelatin in each of 3 empty 6-ounce cans.
  3. Center the banana halves and spoon remaining gelatin around bananas.
  4. Chill until firm, about 2 hours. (Dip remaining banana half in lemon juice; set aside for another dessert.)
  5. Dip each can to the rim in warm water, invert onto plate, puncture bottom and lift off can.
  6. Insert piece of licorice in one end of each mold to resemble firecracker. Makes three servings.
I have never once felt a need to eat a firecracker. That being said, how cool would this be for an Itchy & Scratchy/Simpsons-themed gathering? Also, I adore licorice, so even though I'm skeptical about pairing it with banana and random Jell-O, I'm willing to give it a try. This is our first "appeals to older children" recipe, and it is a good deal fussier than the others featured this week.

You may have noticed some weird little cartoons in the bottom corners of pictures this week. They're part of two different flip books! The right-hand pages show a boy eating a dessert until it's gone; the left-hand pages show a rabbit escaping a magician's hat. There's also tons of magic tricks throughout the book, which helps explain the cover art somewhat. They're "magic tricks by Marvello the Great." If anyone's really eager, I'll post a magic trick before we're done this week. For now, though, I'm going to sign off, have some pizza, cuddle my dog, and remember that earthquakes are really, really rare here, and we're all safe.

Monday, August 22, 2011

Cherry Cola Cooler: Pop, Soda, Coke

Favorite Recipes from Caldwell, IdahoBack in June, I posted a recipe for a cherry Coke salad, and made mention of a similar recipe from a remembered cookbook from my youth. Lo and behold, that book is this week's Amazing Magical Jell-o Desserts and it seems like it's altogether appropriate to feature the recipe that triggered the memory.

I'll admit: I waffled a bit though. I mean, more than one eggnog recipe, sure. More than one way to roast a turkey? Of course. Five different sugar cookie variations? It's only natural. But two cherry Coke Jell-O dishes? It seems a bit...indulgent. But I asked Kelly which recipes she thought I should write about this week, and she immediately said the cherry Coke one. Far be it from me to say no to my sister (at least when her dictates nicely coincide with my wants).

♥ Cherry Cola Cooler

THESE GO IN:
1 package (3 oz.) Jell-O brand cherry flavor gelatin
1 cup boiling water
1 cup cola beverage

GET THESE READY:
mixing bowl
1-cup liquid measure
mixing spoon
4 small glasses

HOW TO MAKE IT:
  1. Dissolve gelatin in boiling water. Add cola beverage.
  2. Pour into small soda glasses or individual dessert dishes.
  3. Chill until set, about 1 hour. Garnish with thawed Birds Eye Cool Whip non-dairy whipped topping and maraschino cherries, if desired. Makes about 2 cups or 4 servings.
It's another ♥ recipe, so think about your preschoolers. Or preschoolers in general. Whatever...it's an easy recipe.

I know I normally take a moment to tell you to use better ingredients, but I'm not going to say a bad word about Cool Whip. I love Cool Whip. It's not a substitute for whipped cream for me; it's an entirely different substance with different applications. For example: whipped cream goes on mincemeat pie, Cool Whip on pumpkin pie. There's an order to the universe.

When this cookbook came out, Cool Whip was just 10 years old. Back then, it was made by Birds Eye -- which makes some sense, as Birds Eye was the really super nifty division of General Foods that was all about revolutionizing frozen foods. Cool Whip: a revolutionary dessert topping. Cool Whip: totally okay to dollop on your cherry cola cooler.

And, no, that's not a paid endorsement. I just loves me some Cool Whip. (If you're hearing Stewie Griffin in your head right now...you're welcome.)

Since we're taking the time to talk brands here, I want to say flat out that I think you should use honest-to-goodness Coca-Cola in this treat. Why? Because I just think it tastes better. It tastes more like a soda fountain. It tastes more like...well, what I think Pop Shoppe cola must have tasted like, and I was a kid who was enthralled at the idea of Pop Shoppe pop. I was a rabid watcher of Ramblin' Rod growing up as I did in the Portland area in the 70s, and Ramblin' Rod gave birthday boys and girls Pop Shoppe pop. It seemed important. It seemed magical. It seemed good. Helluva good bit of promotion, there, ye olde Pop Shoppe.

And, yes. I called it pop. I call it soda now, but that shift only happened once I moved to DC (21 years ago this week!). My dad has held on to "pop" longer, but he calls it "soda pop." No one in my family has ever called anything other than a Coke a Coke, though, so I haven't lost all my sparkling soft drink lingo to the South.

Yet.

Sunday, August 21, 2011

Sunny Whip: Electrical Appliances and Kids

Favorite Recipes from Caldwell, IdahoMy mom's electric mixer was avocado green. The cord unplugged from the mixer, and, once bent back against itself into a tidy bundle, it slipped into an old toilet paper tube which had been covered with little squares of tissue paper and white glue. I'm pretty sure my sister made that, not me, but I can remember every bump of it.

I loved that mixer, and everything associated with it. Do parents still let their small kids use electrical appliances in the kitchen?

Today's Amazing Magical Jell-o Desserts recipe is flagged with a , so we know that at least in the 70s, this was thought of as a "preschoolers can do it, under supervision" recipe.

♥ Sunny Whip

THESE GO IN:
1 package (3 oz.) Jell-O brand orange flavor gelatin
1 cup boiling water
3/4 cup cold orange juice

GET THESE READY
mixing bowl
1-cup liquid measure
mixing spoon
hand beater or electric mixer
rubber scraper
6 dessert glasses

HOW TO MAKE IT:
  1. Dissolve gelatin in boiling water. Add orange juice.
  2. Chill until slightly thickened; then whip with hand beater or electric mixer until fluffy and thick, about double in volume.
  3. Spoon into dessert glasses; chill.
  4. Garnish with halved orange slices, decorated with cloves and maraschino cherries, if desired. Makes 4 cups or 6 servings.
It's never too early to start 'em garnishing, folks.

Though not specified, the rubber scraper is clearly for getting the whip into the dessert glasses.

Notice that there's only 1 3/4 cups of liquid going into this recipe -- 1/4 cup less than you'd expect for a 3-oz. package of Jell-O brand gelatin. Odds are this is just so that if it were to set it would set thicker ... and the thicker thickness gives more structure to the whip. More liquid, and it wouldn't stay as fluffy.

I'm not saying that you couldn't try. Or that you might not want to take out shot or two of water and replace it with, say, vodka or rum. Fluffy Jell-O shots sound delightfully strange.

At that point, though, you'd have to get rid of the ♥ -- we're all for the alcohol here, but not for the pre-school set.

Saturday, August 20, 2011

Amazing Magical Jell-O Desserts: Puddin' Pops

Favorite Recipes from Caldwell, IdahoThere are only a very few cookbooks on my shelves that are from my childhood, and even fewer that are actually the original copy I grew up with, and then there's one, one special one that is an original copy of a cookbook I grew up with that was chock full of recipes I could make, all by myself, right from the start. That book is the winner of the Facebook poll: Amazing Magical Jell-o Desserts: 72 Gelatin & Pudding Recipes Your Kids Will Enjoy (General Food Corporation, 1977).

If you all were hoping for scary molded salads, you're out of luck. This book is all about things that won't freak out the kids. No cabbage. No fish. Nothing called "aspic." Instead, there's lots of single-serving snacks and desserts (and a few pies for the whole family), all rated by difficulty.
Some of the Jell-o brand gelatin and pudding recipes are very easy to make and preschoolers can do them under supervision. These are marked with a ♥ so that you will be able to spot them right away. Other recipes are a little more challenging and will appeal to the interests of older children. These are marked with a ♦. And when you see a ★, you'll know that these recipes are for children with more cooking skills. But none of the recipes is hard; none makes use of any bowl or mold or cutter that you don't have right now in your kitchen. And, best of all, each recipe is fun and delicious.
I'll say.

Our first recipe for the week is one that I always wanted to make and never quite did right. I have an impulse control problem when it comes to a bowl of perfectly-edible-all-by-itself pudding, it seems; it never lasted long enough to get in cups and get frozen.
Illustration by Seymour Chwast, photography by Arnold Rosenberg
♥ Puddin' Pops

THESE GO IN:
1 package (4-serving size) Jell-O brand instant pudding and pie filling, any flavor
2 cups cold milk or half and half

GET THESE READY:
2-cup liquid measure
small mixing bowl
hand beater or electric mixer
rubber scraper
six 5-ounce paper cups
6 wooden sticks or plastic spoons, foil or wax paper

HOW TO MAKE IT:
  1. Prepare pudding mix with milk as directed on package for pudding. Pour into six 5-ounce paper cups.
  2. Insert wooden stick or plastic spoon into each for a handle. Press a square of aluminum foil or wax paper down onto pudding to cover, piercing center of foil square with handle.
  3. Freeze until firm, at least 5 hours.
  4. Press firmly on bottom of cup to release pop. Serve plain or dip in melted chocolate and sprinkles, if desired. Makes 6 pops.
    To melt chocolate: Combine 1/2 cup Baker's chocolate flavor baking chips and 2 tablespoons water in a saucepan and cook and stir until chocolate is melted and mixture is smooth.
Oh, yes. Homemade pudding (excuse me...puddin') pops! A delight on any day, but especially in the hot summer time.

About the only thing I'd change about this is the instructions on how to make the chocolate coating. You in no way need to have your preschooler thinking about a sauce pan. Melt your chocolate in the microwave -- it's easier, it won't seize up on you, and it's much easier all around. You also don't need to use "chocolate flavor" anything. Use some real chocolate.

You deserve it.

Thursday, August 18, 2011

Blotkake: A Special Occasion Layer Cake

Favorite Recipes from Caldwell, IdahoYesterday, I slapped a poll up on Facebook asking which of three recipes from Favorite Recipes from Caldwell, Idaho should be posted today. This one won by a landslide, but never fear: the second place one will go up tomorrow, too, as I run yet another poll on Facebook asking which cookbook I should feature next. Without further ado:
Bløtkake (A Special Occasion Layer Cake)
Mrs. Bjorn Friling


1 1/4 c. sifted cake flour
2 tsp. double-acting baking powder
6 egg yolks
3/4 c. granulated sugar
6 egg whites
3 squares German's sweet cooking chocolate
3/4 c. margarine or butter
1 1/4 c. confectioners sugar
2 eggs
2 c. heavy cream

Make, then freeze, several days ahead as follows: 1. Heat oven to 325°. Line bottoms of three 9-inch layer cake pans with waxed paper. Sift cake flour with baking powder. 2. In small bowl, with mixer at high speed, beat egg yolks with granulated sugar until light. In large bowl, beat egg whites stiff. Fold in yolks and flour. Pour into pans. Bake 15 minutes or until golden. Cool on racks. Remove and freeze in paper. 3. Early in the day to be used: Thaw cakes at room temperature for 1 hour. Meanwhile, with knife, shred chocolate; reserve 1/4 cup. Also, in small bowl, with electric mixer at high speed, with electric mixer at high speed, mix butter with confectioners sugar. Then beat in 2 eggs until creamy. Refrigerate this butter cream. 4. On serving plate, place 1 layer, bottom side up. top with 1/2 of butter cream, then half of shredded chocolate. Set second layer in place, top as before; place third layer. 5. Whip cream; frost cake with some and decorate with rest. Garnish with reserved chocolate. Refrigerate immediately until served.
Say it with me now: BUTTER, not margarine. Use butter.

Now, if you've Googled "bløtkake," as I have, you might be surprised to see that there's not a single berry used in this cake. It's still legit! It seems that bløtkake is sort of catch as catch can in Norway. Use what you have, and what you like. Love marzipan? Cover the whole thing in Marzipan. Blueberries in season? Go to town with blueberries! The chocolate is pretty darned optional.

Chocolate lovers, be at ease: you can use chocolate and berries, if you like. Perhaps some lovely raspberries or sliced strawberries?

Mrs. Frilling also contributed her Norwegian Meat Balls recipe -- that's Kjøttkaker for you Norwegian speakers, or those who like the excuse to use a slashed ellipse in a blog post. That recipe is currently in the running for tomorrow's bonus post -- it's up against Bagdad (sic) Hash, which is a casserole with both canned chow mein noodles and crushed potato chips. Either way, we'll wrap up our time with Favorite Recipes from Caldwell, Idaho on a savory note.

Sunday, August 7, 2011

Key Lime Pie: When It's Too Hot To Turn On The Oven, But You Need Dessert

So, I'm going to a dinner party tonight, and was asked to bring dessert. It's hotter than fuck out there, and sticky, and gross, and I really don't want to turn on the oven. The last time I supped with this group, I also brought dessert, and that, friends, was my near-famous strawberry shortcake with thyme and balsamic vinegar. Mmm. Mmm, yes, but it ruled out another shortcake option (which, face it, is one of the best options in this nasty-assed weather).

So, what to do? By the time I thought of a puff pastry tart, it was too late to buy and defrost puff pastry. (Note to self: buy puff pastry, put in freezer for just such an occasion.) (Additional note to self: you're 39 years old -- shouldn't you be able to type "occasion" properly the first time 'round?)

Long story short (too late), it came down to a chocolate ganache pie (only heat required: microwave for melting chocolate and butter, as long as you use a pre-done crumb crust), or the ultimate in no-bake goodness: Key Lime Pie.

And Key Lime Pie won the day. 2 crumb crusts, 4 egg yolks, 2 cans sweetened condensed milk, and a scant cup of key lime juice. Plus obscene amounts of whisking. No, really. Right now, I'm sitting barely clad right under the a/c because I'm sweating like a pig would sweat if a pig could sweat which they can't. I'm just saying. If offered a wallow, I'd consider saying "yes."

Anywho. I now have two pies setting up in the fridge. I'm not going to top it off with meringue, because, again, see the "no oven, damn it" stance of hot weather cookery. I will likely pick up some whipping cream on the way to the dinner, just because there's extra head room on the pies, and I like a pie that looks ample, not accommodating.

You're thinking to yourself at this point "Um....are those egg yolks raw?" Well...only as raw as the scallops in your ceviche are raw. The acid in the lime juice denatures the proteins in the eggs, "cooking" 'em. If you've a compromised immune system, you might want to shy away from this, but if you're okay with sushi or ceviche or delicious unpasteurized cheeses, you should be fine with this authentic tasty pie.

Scaled down version of the recipe (for those rare occasions where one pie is deemed enough):
Key Lime Pie
Based on bits and pieces of far too many recipes

2 egg yolks
1 14-oz can of sweetened condensed milk
1/4-1/2 cup key lime juice
1 9" graham cracker crumb crust pie shell

If you have a hand mixer, this'd be a good time to use it. Otherwise, this is a good recipe to work out your whisking arms. Whisk the egg yolks until they are very, very pale yellow and frothy. Add in the sweetened condensed milk, and whisk, whisk, whisk, whisk. You want to keep whisking until it is getting noticeably thickened -- when you pick the whisk up out of the goo, it should come off the whisk in sheets, not in drips. So, whisk some more. If you're using electrics, this'll be at about the 4 minute mark. If you're going by hand, it'll be longer. Whisk away, baby. On a really hot day, you might want to make sure you're sitting under an air conditioner, so you can stay cool.

Once your goo is thick, add in 1/4 cup of key lime juice (preferably fresh, but if your choice is between fresh NON-key limes or bottled key lime juice, go for the bottled). Stir, stir, stir until it's well incorporated. Then, dip your very clean pinky tip into the goo, and taste. Is it tart enough? Is it lime-y enough? If not, add more lime juice, up to another 1/4 cup (so, up to 1/2 cup total. No more, or I won't vouch for the setting-up-ability of the pie).

Pour into a prepared crumb crust, scraping all the gooey goodness out of the bowl and into the pie. Place gently in your fridge, and let it sit there for a good 4 hours before serving.

Garnishing options:
  • grated fresh lime zest
  • candied lime peel
  • fresh lime wheels
  • little dabs of whipped cream
  • great big globs of whipped cream
  • more Cool Whip than might strictly be considered healthy
  • meringue made from those 2 egg whites you have left over from separating out your yolks for this recipe (note: this would require turning on the oven)
You could use a ginger snap crust, if you want a ginger-lime pie. You could use a chocolate crumb crust for a black-bottom key lime pie. You could do away with crust completely and just let the goo set up in wee ramekins or custard dishes. I won't judge.

One more variation, for the booze hounds out there--and I know you're there--use 1/4 cup key lime juice, and 1/8-1/4 cup tequila. Voila, you've got a margarita pie!

Saturday, June 18, 2011

Mother's Fruit Cake: Boozeless (Mostly) Fruit Cake

I love a good fruit cake. I even like a mediocre fruit cake. The fact that so many people mock fruit cake makes me sad, mostly because I really would love to start getting fruit cakes as gifts again as folks did in days of whatnot. We've already covered one fruit cake option (Brandied Fruitcake Drops) here, but Presbyterian Palate Pleasers gives us a proper, mostly-full-on recipe.

Mother's Fruit Cake

1 lb. brown sugar
6 eggs
1/2 lb. butter
1-1/2 lb. flour (6 c.)
1/2 tsp. cloves
1/2 tsp. nutmeg
3 tsp. baking powder
1/2 c. milk
1 c. wine
1 lb. currants
1 c. black walnuts
1 lb. raisins
1/2 lb. dates
1/4 lb. citron
1 lb. English Walnuts
1/4 lb. cherries
1/2 lb. figs
1/4 lb. lemon peel
1/4 lb. orange peel
1 c. flour to dredge fruit

Mix ingredients. Grease and flour one large tube pan and one 9x3" loaf pan. Fill each pan 2/3 full and bake at 275° until a toothpick inserted in center comes out clean. Serves about 25. Old recipe.

Anne Hinkle
Oh, Anne. We had such high hopes, seeing as how your churchly volunteering led you to take a bartending course. One cup of wine hardly seems properly boozy for such a lot of cake. Especially seeing as how the wine is baked with the cake, and so much of the alcohol goes away.

To fix this, I'd suggest basting the finished cake in rum, and then soaking cheesecloth in rum and wrapping the cake up with the cheesecloth and basting it every few days/weeks for a good long time.

My mother, however, prefers her fruitcake boozeless. No, really. She has many other fine qualities, I assure you.

Though the recipe doesn't specify, I'm betting all the fruit in this recipe should be dried and/or candied/glaceed. The cloves should be ground. The nuts can be swapped with other nuts if you're anti-walnut. The wine can be whatever you have -- knowing that it will lend color to the cake if you use red wine. I'd go for a sherry, or a tawny port, likely.

My favorite thing about this recipe has got to be the fact that there are two cake pans in use here. One gives you a big, pretty, take-it-to-the-church-pot-luck sort of cake. The other one is what you keep for yourself, to nibble on next to a cup of tea or a glass of sherry or port.

Monday, June 13, 2011

Grasshopper Pie & Rhubarb Pie: Pies for Peace

Sometimes, when it seems the whole world is sliding into a cesspit, JJ, Heather and I declare Pies for Peace. Basically, this means we get together and bake pie after pie after pie. Somehow, filling the kitchen with yummy smells makes the world at large seem a bit more cheerful and manageable.

Pies for Peace shouldn't be confused with Piepocalypse, our yearly Thanksgiving glut of pie. One is all about peace and the other is all about topping last year's number & variety.

Like any self-respecting church cookbook, Presbyterian Palate Pleasers has a lot of pie recipes. Today, we'll look at two of them: Grasshopper and Rhubarb.

Grasshopper Pie

Crust:
16 Oreo cookies (crushed)
3 Tbsp. melted butter

Mix and press into a pie pan.

Filling:
24 marshmallows
3/4 c. milk
2 oz. creme de menthe
1 drop green food coloring
1 oz. creme de cacao
1 c. whipped cream

Melt marshmallows in double boiler. Add milk, blend and cool. Add creme de menthe and creme de cacao. Fold in whipped cream; add food coloring. Pour into cookie crust and chill.

Ann Bean

How much do I love grasshopper pie? It was one of my favorites growing up -- the other was coconut impossible pie, which I should really dig up and post here, because...yum. Anyway, I am not quite sure how such a boozy pie became the favorite of a wee child. I suppose it's possible my mom used mint extract and chocolate syrup or some such, but really, I doubt it.

This is one of the easier grasshopper pie recipes you'll see out there. No fiddling about with gelatin, no whipped egg whites. One thing to note: It's 24 big marshmallows, not mini. I advise you to toss the double boiler; you can melt the marshmallows in the microwave. "Less fussy" is usually the way to go.

For the ultimate in reduced fussiness, you could always buy your chocolate crumb crust pre-made. Your pie will lack a certain rustic beauty, though, and you'll miss out on the fabulous catharsis one can find when bashing Oreos into dust.

Rhubarb Pie

3 large c. rhubarb
1 egg
1-1/2 c. sugar
Butter size of walnut

Pour boiling water over rhubarb and let stand 5 minutes; drain. Mix all ingredients well and fill unbaked crust. Dust with flour and put on top crust. Bake at 350°F for 40-50 minutes.

Mrs. George S. Lehner

(Mrs. Lehner and her husband owned and operated the Dagmar Hotel for years.)

Go, Mrs. Lehner! Here's her hotel:

Hagerstown Dagmar Hotel
Dagmar Hotel, Hagerstown, MD,
by Mr. T in DC, under Creative Commons license.


The Dagmar Hotel was also the headquarters of the M.P Moller Motor Car Company for a good stretch of time. They made custom cars (called Dagmars, naturally).

Now, I dig that cooks of yore often assumed you knew without being told that you'd need crust for a double crust pie, and that you would know how to make it. I know how to make a really good pie crust.

Confession time: I usually just buy the Pillsbury crust from the refrigerator case. What can I say? It's not as good as homemade, but it's only marginally less good, and it's so fricking easy. So, you can do as I do, and there's no judgement coming at you from this corner. You can rustic it up with your crimping technique, or by being less than anal with straight lines for your lattice strips.

Never done a lattice crust? Don't fret -- it's easy, and there are lots of tutorials on how to make a lattice crust out there.

I will insist upon you having a lattice crust. It's rhubarb pie. I can't imagine a rhubarb pie without a lattice crust. Save your regular top crust for your apple pies, your blackberry pies, your peach pies. Go lattice for rhubarb.

Three cups of rhubarb is about one pound, for what it's worth. Yes, you could buy a pound of chunked up frozen rhubarb -- if you do, thaw it before using -- but it's still rhubarb season. Go buy a pound.

Saturday, June 11, 2011

Strawberry-Rhubarb Puff: A Reminder About Altering Recipes All You Want

Betty Crocker's Outdoor Cook BookIt's time for our semi-regular reminder about how most recipes are more about method and less about specific implementations. The Betty Crocker's Outdoor Cook Book has more than its fair share of brand-specific recipes, and relies a bit more on canned/tinned/processed foods than modern sensibilities tend to allow (in public, at least -- in private, even Chefly Husband eats ravioli right out of the can sometimes).

Thing is, all the glorious 1960s short cuts? Can be slowed down. And, really, if you're picnicking, sometimes it's all about reclaiming an older, slower, simpler something.

Illustration by Tom Funk.

Strawberry-Rhubarb Puff
Ideal to carry to picnic site and reheat.

1 pkg. (16 oz.) frozen rhubarb, thawed
1 pkg. (10 oz.) frozen strawberries, thawed
1/2 cup sugar
1 can Betty Crocker Bisquick Refrigerated Biscuits
1/4 cup butter
1/4 cup sugar
1 tsp. cinnamon

Heat oven to 375°F (quick mod.). Mix rhubarb, strawberries, and 1/2 cup sugar in sq. pan, 9x9x1 3/4". Cook 5 min. over medium low heat. Place biscuits on top of hot fruit. Make hole in each biscuit and put a little butter and mixture of sugar and cinnamon in each hole. Bake 25 to 30 min. Cool. Cover top of pan with aluminum foil; place pan on outdoor grill. Heat until aluminum foil feels hot. Uncover and serve with cream or whipped cream, if desired. 8 to 10 servings.

Let's give a bit of thanks that the temperature is given in degrees, and not just with the guidance of "quick moderate." Even "hot" and "very hot" temperatures vary depending on who's judging. I trust that it's good to know how long one can put one's hand in an oven of a certain temperature, but as I don't cook in a wood stove, and don't intent to, I'm happy with °F.

I've not seen refrigerated Bisquick biscuits before. If you want to be a recipe purist, your best bet is going to be "can o' biscuits" -- choose your favorite brand.

If we're slowing down this recipe, though, how's about making your own biscuit dough? Use your favorite recipe that makes 8 or so big biscuits. No need to worry about cutting the dough into rounds; you can cobble the top with little bits of dough you tear off.

Did I say "cobble"? Well, sure. The recipe may say "puff," and I'm not going to say the dough won't puff, but it's a cobbler. Cobble away.

Other ways to slow this down: don't use packaged frozen fruit. Go to the store. Rhubarb's in right now, as are strawberries. Get a pound of one, and a pint or quart of the other, and slice up into nice even-ish chunks. If there's no rhubarb, you can choose some other fruit. Or, if you're not a strawberry person, how's about some nectarines, or blueberries?

I'm not opposed to frozen fruit. I have lots in my freezer right now. But it takes only a smidge longer to use in season fruit and feel a touch more connected.

Tuesday, December 21, 2010

Santiago Cake and Nostalgia: Tarta de Almendra O Merlo

Delicioso!Christmas is just days away, and I'm filled with a hankering to bake. We had a cookie exchange at work a few weeks ago (I made 7 Layer Cookies), but there's still room in my holiday kitchen for something sweet. Okay, I'll admit it: almost all the cookies are already gone. There was a caroling party! It was raining! People ate cookies!

Getting back to the point, Delicioso! The Regional Cooking of Spain shares a baked good I had at the end of more than one happy meal in Spain.

Tarta de Almendra O Merlo
(Galician Almond Cake O Merlo)


There is hardly a restaurant in Galicia that does not offer the region’s traditional almond cake, often called tarta de Santiago because the cross of Spain’s patron saint, Santiago, is usually emblazoned in the cake with caramelized sugar.

Santiago, known in English as the apostle Saint James, was said to have traveled to Spain to preach the Gospel, and after he was martyred in Jerusalem his body miraculously reappeared in Galicia in a field that gradually developed into the glorious city of Santiago de Compostela (see my Discovering Spain: An Uncommon Guide for the full story). Santiago de Compostela became a place of mass pilgrimage in medieval times as millions of Europe’s faithful made the arduous journey on foot to reach the shrine of the Apostle. On of Galicia’s most enduring symbols is the distinctive cross of Santiago.

Tarta de almendra is a single-layer almond cake, simple and moist. Although served as a dessert in Galicia, we would probably consider it more appropriate as a tea cake. One of the best I have eaten comes from Alfonso Merlo, the owner and chef of O Merlo, in the provincial capital of Pontevedra, a restaurant specializing in tapas that are often meal-size. It is a great place to eat when here to visit the city’s quaint Old Quarter and delightful old squares.

Makes one 8-inch cake

6 ounces blanched almonds (about 1 cup)
6 tablespoons flour
¾ cup sugar
3 eggs
Confectioners’ sugar

In a processor, coarsely chop 2 ounces (about 1/3 cup) of the almonds with the flour. Remove from the processor and reserve. Now add to the processor the remaining almonds and ¼ cup of the sugar, and grind the almonds as fine as possible.

In a bowl, with an electric mixer beat the eggs until foamy. Add the remaining ½ cup sugar and beat until the mixture is light-colored and thick. Then beat in the sugar-and-almond and flour-and-almond mixtures. Pour into a greased and floured 8-inch springform pan and bake at 350°F for about 35 to 40 minutes, or until the cake springs back slightly to the touch. Cool, then remove the rim of the pan and sprinkle the cake heavily with confectioners’ sugar.

To burn the traditional cross in the sugar, heat a thin metal skewer (protect your hand with a pot holder) over a flame until the lower portion is red-hot. Press the skewer over the center of the cake to caramelize the sugar. Wipe off the skewer, reheat, and repeat to form a cross.

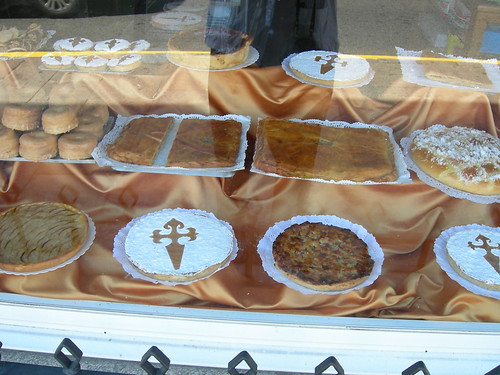
I never even once saw the cross burnt into the sugar. Never once. No, instead the cross was stenciled on to the cake with powdered sugar.

Santiago bakery window; some rights reserved


Oh, the bakery. This bakery was actually in Santiago proper, just as we were walking down the last hill into the center of town. You can see the full-sized cakes, and the smaller cakes. The apple pies. Oh! The donuts! And, dead center, there's even big empanadas.

The Santiago cake (and, yes, I only ever heard it called tarta de Santiago, and never de Almendra) is so very moist. Moist, and dense, and crumbly. I'd serve it with a dollop of stiff whipped cream on the side, and some raspberries or a sprig of mint. Even with the signature dessert of the region, things are kept best when kept simple.

I'll tell you, this goes fine with cider or wine, but I bet it'd also be amazing with some sherry. Or...some kirsch.

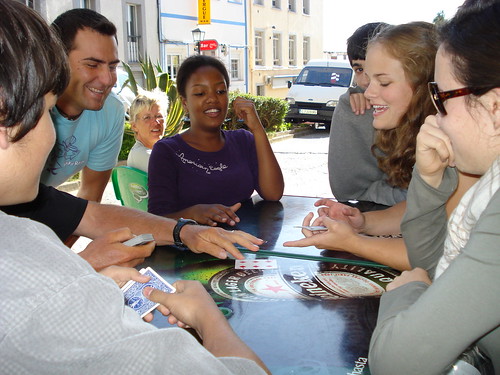
I think the first slice I had was in Palas de Rei, right after we met up again with Mr. and Mrs. Belgium. We knew their real names, but as they'd walked out their front door in Belgium months before and just kept walking, we called 'em Belgium. They thought it was funny. We played a mean game of Uno that afternoon, and a meaner game of Bullshit.

Card games on the Camino, photo by Wendy A F G Stengel, some rights reserved


The time walking on the Camino was special; the time together in the afternoons and evenings, tired and sharing a new common set of references... it was amazing. I'm feeling all nostalgic; all the youth who went on that pilgrimage with me have graduated, gone off to college... I hope I get to see them when they come back into town for Christmas.

It's not a bad time of year for nostalgia, served up with a slice of cake.

Wednesday, July 14, 2010

Plan For Future Happiness: Tutti-Frutti

I've been gorging myself on berries lately; 'tis the season, after all. Blueberries with breakfast. Blackberries with lunch. And while I'd love to tell you about how you can set up jar after jar of preserved summer splendor, let's face it: I live in a tiny 1937 apartment, I have no storage space for such bounty, and my stove top lacks the oomph needed to efficiently get a big kettle of water boiling sufficiently to make preserving jams and jellies and whatnot a pleasant experience. Also, unless you've gone out and picked your own fruit, odds are you don't naturally have enough fruit on hand at any given point to do a proper day of canning. Favorite Recipes from Matinicus Island Maine has the solution for you: preserve the fruit you get as you get it, in a crock, no fuss, no muss.
Tutti-Fruitt

Put 1 pint brandy into a stone jar, add various fruits as they come into market. To each quart of fruit add same quantity of sugar, stir mixture each morning until all fruit has been added. Strawberries, raspberries, apricots, peaches, cherries, pineapple are the best to use.

-- Mrs. Day's Mother's
Aaaaah, tutti-frutti. All fruits. Let's get this out of the way: Yes, you can purchase the fruit especially for this.

You can also use this as a way to keep the fruit that you bought too much of at the store that day you swore you were going to drop thirteen pounds before your high school reunion.

Strawberries should be washed and hulled; you needn't slice them up. Raspberries should be washed. Halve your apricots and take the stones out; you don't need to skin them. Peaches, on the other hand, you'll need to peel (it's not as hard as it seems, but it does involve a big pot of boiling water and a big bowl of ice water; ask if you have questions). Cherries should be washed, stemmed, and pitted. Pineapple should be purchased already cored and peeled.

Okay, the last one was a joke. Though I won't mind if you do buy it pre-prepared. But you can honestly do it yourself.

You can use other berries (blue, black), or other stone fruits (plums, plums, plums) (and nectarines). Use the juicy soft fruit that you have on hand.

All that stuff is easy. The stone jar might be a bit more difficult. If you're lucky, you'll have a big 5 gallon pickling crock at hand. I have one, and yes, you may be jealous. My mother-in-law gave it to me. Okay, she might have given it to us, but I've thoroughly claimed it. To do this recipe up right, you're going to need at least a 3 gallon non-reactive container. You also have to be able to disinfect the hell out of that beastie; fermentation is our friend here, but mold is definitely not. You're also going to want to keep this puppy in the dark, and keep it covered; bugs and vermin are also not our friends.

When is it ready? Well, one could argue that it's always pretty much ready. But if you want to make it extra super duper special, keep it fermenting away until Christmas time. Yes. Really. Even if you started it with the very first strawberries of March. December. And wouldn't you appreciate a taste of spring and summer in the bleak mid-winter?

Now, you might be asking yourself how to serve your tutti-frutti. Try it over ice cream. Try it under whipped cream. Try it whooshed up a bit in a blender with some cream cheese and yogurt to make a dip for gingersnaps. Try it on pancakes or pound cake or chocolate cake. Try it in a cake -- perhaps we can scrounge up a good old fashioned tutti frutti cake recipe from someone's grandma in one of these books.

When the fruit's all gone (or even before), use the syrupy liquid as, well, syrup. Your waffles will thank you.