Friday, December 24, 2010

Christmas Eve: Potato Soup

It's Christmas Eve in DC. On Christmas Eve, we don't use cookbooks. No, we fly by tradition, and tradition means Potato Soup.
Mom, Kelly, and Grandma, early 1970s.
My Family's Potato Soup

Take your sauce pan or soup pot, and put it on the stove. Cut up a package of bacon and frizzle up the pieces in the pot. Cook until just this side of crispy (unless Kelly is going to be at dinner, in which case, cook until well and truly dead on the crispy side, and then you'd best be cooking more than one package, too), and remove to a plate lined with paper towels. Drain off fat. Remember that Dad had a crock of bacon fat in the fridge, and wish you had one, too. Remember that you only ever cook with bacon fat when you are also cooking bacon, so you don't need to store bacon fat up for other purposes. Get on with cooking.

Peel one potato per person coming to supper. Cut into a chunky rough dice -- these do not need to be perfect cubes, but they should be roughly all the same size so they'll cook evenly. Drop your chunks into the pot you just cooked bacon in. (You didn't wash it out, did you? You want the brown crusty bits for flavor.) Chop up one onion, fine, and add it to the pot. Cover potatoes with water -- just cover, no more -- and turn on the heat. Bring it to a boil, then drop to a simmer, and simmer for 20 minutes. At 20 minutes, you should be able to slide a knife point easily into and out of the potato chunks. Open a can of evaporated milk, and pour it into the soup. Stir and leave on the stove just long enough to warm up the milk. Crumble in the bacon, and stir.

Serve up in bowls. and remember the bowls that it should be served in (they have roses on them), and garnish with a pat of butter and a good hefty sprinkling of seasoned salt (Lawry's is the family tradition). Buttered saltine crackers may be served on the side.
So, that's the soup. It's from Dad's side of the family -- I know Grandma made it (that's her in the picture, on the right), but I don't know if her mom made it. Dad's first time trying to make it went...adventurously, as he used condensed milk instead of evaporated. Sweetened condensed milk. It was vile. Momma makes it (she's on the left of the picture), I make it, Kelly makes it (she's the cutie with the doll in the middle). We've the sense and family knowledge to know that sweetened condensed milk is no the way to go.

Anyway, we make potato soup. It's what we do.

You might be surprised that we don't cook up that onion in the bacon fat. You can do it. Heck, sometimes? I do. But never on Christmas Eve. The milder, less caramelized flavors taste like family Christmas. When Momma or Kelly makes it, there's often no onion, or one pot done with no onion. Aunt Linda abhors onion. She has many fine qualities, but can't eat onions.

We also don't add salt during the cooking, mostly because there's a shit ton of salt in the bacon, and we add salt when serving. If you can't bring yourself to use seasoned salt, or can't imagine not correcting seasoning on the stove, add salt your way, and garnish with paprika for the lovely color.

I do try to be truthful here on Take One Cookbook... traditionally? We garnish with margarine and we spread margarine on the crackers. I don't stock margarine in my house, though, and I'm here to tell you: BUTTER TASTES BETTER. Not just in general, but specifically in this soup, butter is better.

If you want a smoother texture to your soup, do not be tempted to cook the potatoes until they fall apart into a mush. When they fall apart like that, they're "blown away" and not in a good way. It will taste like paste, and it will be grainy and gross. If you want smooth, get out a blender, and purée some of the soup, adding it back in to the whole.

One can of (evaporated) milk will get you easily through 4 people/potatoes. If you have more people coming to table, I would suggest adding an extra can if you have more folks:

1 can = 1-4 servings
2 cans = 5-8 servings
3 cans = 9-12 servings (you need more bacon at this point, too)

So, that's Christmas Eve in our family. Christmas Day doesn't have set rules/tradition for meals, but Christmas Eve is set in stone. It's in our blood.

A bowl of potato soup is Christmas Eve.

Wednesday, December 22, 2010

A Different Green Bean Dish: Judías Verdes Rehogadas con Jamón

Delicioso!I'm nuts about Christmas. I blame it in part on the fact that my dad's a Christmas tree farmer. Whatever the reason, I know this for sure: I'm just giddy with excitement because Christmas Eve is just two days away!!!

If you're looking to change up your holiday side dishes, ditch the green bean casserole with the can of fried onion whatnots on top. Try instead this recipe from Delicioso! The Regional Cooking of Spain :
Judías Verdes Rehogadas con Jamón
(Green Beans Sautéed with Cured Ham)


Whenever we stay in Niserias in Asturias (as we often do, since my husband loves to trout-fish in the cares River) we dine at Casa Julián (see p. 113), where co-owner and cook Vincentina produces simple Asturian fare with an expert hand. My favorite first course is her sautéed green beans, seasoned with garlic and generously sprinkled with mountain ham.

Serves 4

Salt
1/2 small onion
1 1/2 pounds broad green beans, ends snapped off
2 tablespoons olive oil
4 cloves garlic, lightly smashed and peeled
2 ounces Spanish mountain cured ham or prosciutto, in small cubes or thin squares (about 1/4 cup)
Freshly ground pepper

Bring a pot of salted water to a boil, add the onion and green beans, return to a boil, then cook uncovered at a slow boil for about 20 minutes, or until cooked as desired. Discard the onion and drain the green beans in a colander. Refresh with cold water.

In a skillet, heat the oil with the garlic, pressing the garlic with the back of a wooden spoon to release its flavor, until the garlic is golden on both sides. Add the beans and the ham, season with salt and pepper, and sautée, stirring, over a medium flame, until the beans are hot.
If I read this recipe for the first time, I would say "Hell, no!" Then, I'd walk away, shaking my head. "Cook beans for more than 20 minutes? They'll be mush!" I'd laugh, disbelieving. "Boil the onion?!?!?! That onion should be diced and fried with the garlic!"

I'd have a wealth of culinary tradition and experience behind me.

I'd also be wrong.

Judías Verdes Rehogadas con Jamón, or Green Beans with Ham, photo by Wendy A F G Stengel, some rights reserved


This was the first course in our last meal in Spain. We'd made it to Santiago, we'd been to Mass, we'd waited in line for hours to get our credentials, and we had a celebratory meal and final communion for our pilgrimage group.

And this was damned tasty.

I'm not a cook-it-'til-it's-dead girl when it comes to vegetables. I'm really not. But, dang, these beans taste good after a long slow simmer with ham.

Need I say everything was local? Everything? Was local.

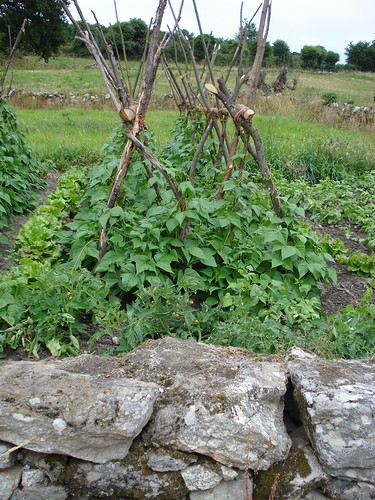
People grow their own everything.

Garden in Spain, photo by Wendy A F G Stengel, some rights reserved


Their own beans.

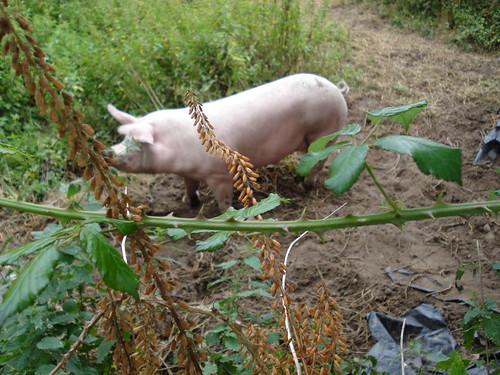
Backyard pig in Spain, photo by Wendy A F G Stengel, some rights reserved


Their own ham.

I know the pig's out of focus (and that it's not ham ... yet); I heard it grunting on the other side of a garden wall, held my camera up high, and sort of just hoped I'd get a picture of whatever was making the sound. So, out of focus or no, I love this picture of the ham-to-be.

But I digress!

I rather thought I might.

Point being: think outside the can of cream of whatever and tinned questionable crispy onionesque casserole topping, and bring a bit northern Spain to Christmas this year.

Tuesday, December 21, 2010

Santiago Cake and Nostalgia: Tarta de Almendra O Merlo

Delicioso!Christmas is just days away, and I'm filled with a hankering to bake. We had a cookie exchange at work a few weeks ago (I made 7 Layer Cookies), but there's still room in my holiday kitchen for something sweet. Okay, I'll admit it: almost all the cookies are already gone. There was a caroling party! It was raining! People ate cookies!

Getting back to the point, Delicioso! The Regional Cooking of Spain shares a baked good I had at the end of more than one happy meal in Spain.

Tarta de Almendra O Merlo
(Galician Almond Cake O Merlo)


There is hardly a restaurant in Galicia that does not offer the region’s traditional almond cake, often called tarta de Santiago because the cross of Spain’s patron saint, Santiago, is usually emblazoned in the cake with caramelized sugar.

Santiago, known in English as the apostle Saint James, was said to have traveled to Spain to preach the Gospel, and after he was martyred in Jerusalem his body miraculously reappeared in Galicia in a field that gradually developed into the glorious city of Santiago de Compostela (see my Discovering Spain: An Uncommon Guide for the full story). Santiago de Compostela became a place of mass pilgrimage in medieval times as millions of Europe’s faithful made the arduous journey on foot to reach the shrine of the Apostle. On of Galicia’s most enduring symbols is the distinctive cross of Santiago.

Tarta de almendra is a single-layer almond cake, simple and moist. Although served as a dessert in Galicia, we would probably consider it more appropriate as a tea cake. One of the best I have eaten comes from Alfonso Merlo, the owner and chef of O Merlo, in the provincial capital of Pontevedra, a restaurant specializing in tapas that are often meal-size. It is a great place to eat when here to visit the city’s quaint Old Quarter and delightful old squares.

Makes one 8-inch cake

6 ounces blanched almonds (about 1 cup)
6 tablespoons flour
¾ cup sugar
3 eggs
Confectioners’ sugar

In a processor, coarsely chop 2 ounces (about 1/3 cup) of the almonds with the flour. Remove from the processor and reserve. Now add to the processor the remaining almonds and ¼ cup of the sugar, and grind the almonds as fine as possible.

In a bowl, with an electric mixer beat the eggs until foamy. Add the remaining ½ cup sugar and beat until the mixture is light-colored and thick. Then beat in the sugar-and-almond and flour-and-almond mixtures. Pour into a greased and floured 8-inch springform pan and bake at 350°F for about 35 to 40 minutes, or until the cake springs back slightly to the touch. Cool, then remove the rim of the pan and sprinkle the cake heavily with confectioners’ sugar.

To burn the traditional cross in the sugar, heat a thin metal skewer (protect your hand with a pot holder) over a flame until the lower portion is red-hot. Press the skewer over the center of the cake to caramelize the sugar. Wipe off the skewer, reheat, and repeat to form a cross.

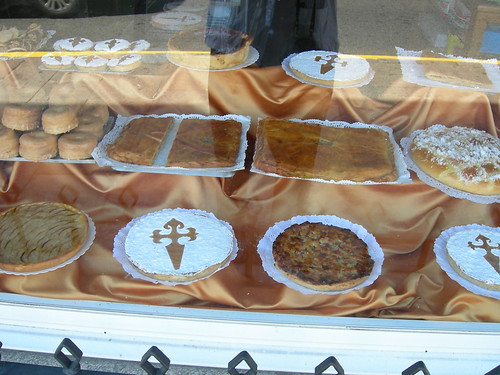
I never even once saw the cross burnt into the sugar. Never once. No, instead the cross was stenciled on to the cake with powdered sugar.

Santiago bakery window; some rights reserved


Oh, the bakery. This bakery was actually in Santiago proper, just as we were walking down the last hill into the center of town. You can see the full-sized cakes, and the smaller cakes. The apple pies. Oh! The donuts! And, dead center, there's even big empanadas.

The Santiago cake (and, yes, I only ever heard it called tarta de Santiago, and never de Almendra) is so very moist. Moist, and dense, and crumbly. I'd serve it with a dollop of stiff whipped cream on the side, and some raspberries or a sprig of mint. Even with the signature dessert of the region, things are kept best when kept simple.

I'll tell you, this goes fine with cider or wine, but I bet it'd also be amazing with some sherry. Or...some kirsch.

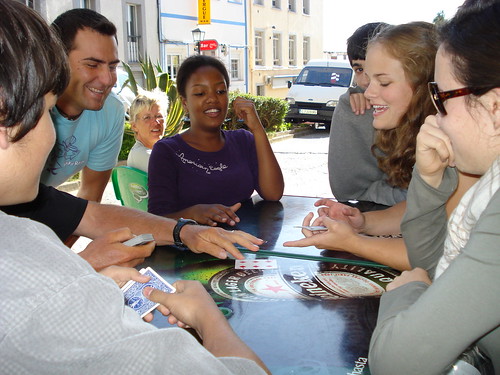
I think the first slice I had was in Palas de Rei, right after we met up again with Mr. and Mrs. Belgium. We knew their real names, but as they'd walked out their front door in Belgium months before and just kept walking, we called 'em Belgium. They thought it was funny. We played a mean game of Uno that afternoon, and a meaner game of Bullshit.

Card games on the Camino, photo by Wendy A F G Stengel, some rights reserved


The time walking on the Camino was special; the time together in the afternoons and evenings, tired and sharing a new common set of references... it was amazing. I'm feeling all nostalgic; all the youth who went on that pilgrimage with me have graduated, gone off to college... I hope I get to see them when they come back into town for Christmas.

It's not a bad time of year for nostalgia, served up with a slice of cake.

Sunday, December 19, 2010

A Forest of Greens In Every Yard: Caldo Gallego

Delicioso!Nearly every bar, restaurant, hotel, inn, and whatnot along the pilgrim trail to Santiago serves up a Menu Peregrino, a Pilgrim Meal. It's cheap as chips, three courses, and includes bread and wine. Lots of wine. Usually bottles of wine. Oh, the wine! Anyway. At nearly every place we stopped, I was offered and I greedily accepted a hot bowl of Caldo Gallego. Brothy, with greens and potatoes, and often nothing else that was identifiable, it still stood up to a tired pilgrim's appetite, especially when said pilgrim dunked in some bread. Delicioso! The Regional Cooking of Spain offers up this version:
Caldo Gallego
(Galician Meat, Potato, Greens, and Bean Soup)


Start preparation 1 day in advance
There is remarkably little variation from one cook to the next in the preparation of Caldo Gallego, the famous soup that has traveled the world with Galician émigrés. Only one ingredient, chorizo, is a point of contention. Purists reject it, yet many traditional recipes include it; it does, in fact, produce a richer, more flavorful soup. The kinds of greens may also vary, although grelos—closely akin to collard greens—are most typical. Caldo Gallego is hearty enough to be a meal, but you may choose to serve it in smaller portions as a first course or as an accompaniment to a light supper.

Serves 4-6

½ pound medium dried white beans
1 tablespoon olive oil
2 cloves garlic, minced
1 teaspoon imported sweet paprika
7 cups water
1 pound boneless beef chuck
1 beef or ham bone
¼ pound Spanish mountain cured ham, prosciutto, or capicollo, in a thick chunk
A 2-ounce piece slab bacon or salt pork
1 leek, well washed
½ pound collard greens, Swiss chard, or kale, thick stems trimmed and coarsely chopped (about 4 cups)
¾ pound small (about 2-inch diameter) new or waxy red potatoes, peeled
¼ pound sweet chorizo
Salt

Soak the beans overnight in water to cover. Drain.

In a small skillet, heat the oil and garlic and sauté a minute (the garlic should not color). Turn off the flame and add the paprika. Stir in a tablespoon or two of water.

Add to a soup pot the water, beans, beef, bone, ham, slab bacon, leek, and garlic mixture from the skillet. Bring to a boil, cover, and simmer about 2 hours, or until the beans are almost tender.
Add the greens, potatoes, chorizo, and salt to taste, cover and continue cooking until the potatoes are done, about 30 minutes.

Remove and cut up the beef, ham, bacon, leek, and chorizo and return to the pot. Discard the bone. Cover and let sit 10 minutes before serving. Reheat if necessary.

I don't remember ever seeing potatoes in my caldo, nor often any beans. It's peasant food, and as such lends itself easily to whatever you have on hand. If you have chorizo one day, add it. If not, don't do a run to Whole Foods, just go without.

I wouldn't get too precious about the kind of greens you use, either. Grelos, mentioned above, are turnip greens. You could use 'em, sure. You could use collard greens, or kale, or chard... Use what you have, or the first thing you lay hands on.

Gallego greens garden, photo by Wendy A F G Stengel, some rights reserved


Just about every home we passed on the Camino had a yard filled with greens. Big, waist- or chest-high primeval stalks. When it was time to make the caldo, they'd step outside, cut a few leaves off with their kitchen knives, and they were ready to go.

I'd file this away under "deceptively simple." It doesn't sound like much in the writing up, it doesn't look like much in the bowl, but mercy me, it's a damned fine bowl of soup.

Saturday, December 18, 2010

Pork Pie (Not the Hat): Empanada Gallega de Raxó

Delicioso!When I was a wee thing growing up in Oregon, we didn't have Taco Bell, we had Taco Time. So, I grew up thinking that an empanada was a filled, fried cylinder of questionably fruit origin, covered in sugar. Good stuff. Further experience introduced me to Latin American empanadas, big full pocket pies of meaty goodness. Let's face it: I'm a fiend for a savory pie, I'm a fiend for an individual-sized pie, so I'm a fiend for empanadas.

It comes then as no surprise that when I saw an empanada on a menu in Spain, I ordered it. This recipe from Delicioso! The Regional Cooking of Spain is spot on for the unexpected--but wonderful--empanada:
Empanada Gallega de Raxó
(Galician Pork and Peppers Pie)


Start preparation 2 hours in advance

I have never found a filling that is tastier and more succulent than this one for Galicia’s classic savory pie. Empanadas, however, may be filled with many other mixtures, from tuna, scallops, and sardines to rabbit and chicken. The dough also varies according to the cook, from a real bread dough to a much more refined modified puff pastry. Here I have provided my favorite puff pastry empanada dough from Tapas: The Little Dishes of Spain, but when I do not have the time or inclination to make my own pastry, I go to my local pizzeria and buy an uncooked pizza dough. The empanada comes out just like those of Galicia based on bread dough.

Empanadas cut in small wedges or squares make excellent tapas, and in larger portions, accompanied by a salad, make a most enjoyable light meal. I think they are at their best freshly baked but at room temperature.

Makes about 4 dinner or 8-10 tapas portions

Puff Pastry for Empanadas (p. 109) or 1 ½ pounds pizza dough
3 cloves garlic, peeled
2 tablespoons minced parsely
1 ½ teaspoons minced oregano leaves or ¼ teaspoon dried
Several strands of saffron
1 ½ teaspoons thyme leaves or ¼ teaspoon dried
¼ cup olive oil
3 tablespoons dry white wine
¾ pound boneless pork loin, cut in 1/8-inch slices, then in 1/2-inch strips
1 large onion, preferably Vidalia or Spanish, slivered
¾ pound green frying peppers, cored, seeded, and cut in long narrow strips
3 teaspoons imported sweet paprika
¼ pound tomato, skinned, seeded, and chopped
4 tablespoons (1/4 cup)finely diced Spanish mountain cured ham, prosciutto, or capicollo
Salt
Freshly ground pepper
1 hard-boiled egg, sliced
1 pimiento, imported or homemade (p. 178), cut in strips
1 egg, lightly beaten with 1 teaspoon water

If using homemade dough, prepare according to instructions.

In a mortar or mini processor, mash to a paste the garlic, parsley, oregano, saffron, and thyme. Mix in 1 tablespoon of the oil and the wine. Transfer to a bowl and mix in the strips of pork, coating them well. Marinate 2 hours. Drain the meat and reserve the marinade.

In a shallow casserole, heat 2 tablespoons of the oil and slowly sauté the meat until it just loses its color. Return the meat to the reserved marinade. Add the remaining tablespoon of oil to the casserole and sauté the onion and pepers a minute or two. Cover and cook very slowly for 15 minutes. Stir in the paprika, then turn up the heat, add the tomato, and cook 5 minutes. Stir in the paprika, then turn up the heat, add the tomato, and cook 5 minutes. Add the pork wit hits marinade and the ham and season with salt and pepper.

Roll the dough into a 14- by 28-inch rectangle. Divide into two 14-inch squares, then trim the corners to make two 14-inch circles. Place one of them on a cookie sheet (dampened if using pastry dough, sprinkled with cornemeal or flour if using pizza dough) and arrange the pork mixture to within 1 inch of the edge. Scatter on the egg slices, top with the pimiento strips, and cover with the second dough circle. Roll up the edges and press well to seal. Make several slits in the dough, brush with the beaten egg, and bake at 350°F for about 30 to 35 minutes, or until browned. Cool a few minutes before serving or serve at room temperature.
Oh, yes. Bread and meat and deliciousness, coming out looking like a stuffed pizza. Don't believe me? Take a gander:

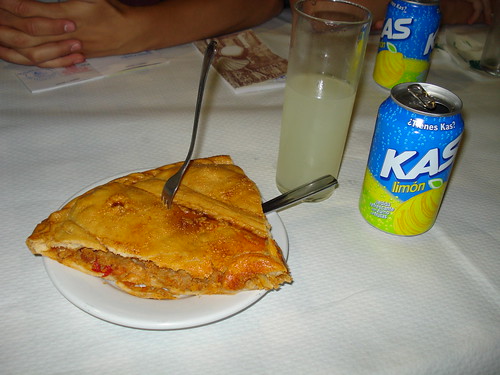
Empanada and lemon soda. Photo by Wendy A F G Stengel; some rights reserved.


Not the most artistic of all possible photos, but look! That's my wedge o' empanada, proper Spanish empanada! Beats the heck out of a Taco Time anything, I don't mind telling you. (All due and right respect to Taco Time; you taught me to dip crispy burritos in ketchup...you taught me there could be crispy burritos.) Everyone else ordered pizza, so I'm betting that they used pizza dough for the empanada, too. If anyone feels a strong need for the puff pastry recipe referenced above, I'll post it, but, really: use some pizza dough. Speed up your process. Get to the good stuff. The pork. The pie. The pork pie (not a hat).

Tasty, hearty, filling without weighing you down. Trust me. And, yes, you really do serve up a full quarter as a serving. The Camino is a long, long walk.

Delicioso! The Regional Cooking of Spain: Alubias Rojas de Tolosa con Berza

Delicioso!I've been plotting out my course for the new year. See, like a lot of people, I make food-related resolutions, and money-related resolutions. This year, however, I'm making a food-AND-money-related resolution: I'm going to cut back on my food expenditures by planning ahead and actually bringing a home made breakfast and lunch to work with me, rather than going out. Even just walking to the grocer's near work to buy a frozen whatnot adds up, if not in pennies, then in healthfulness. I like to cook, I cook well, what I cook tastes better than what I'd pick up at the grocer's, and so, darn it, I should do it. I was going through old favorite recipes, and kept running smack up against ones that I'd written about here. So here we are, back at the good ol' blog!

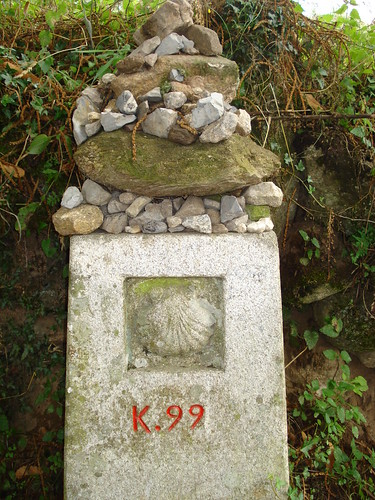
We're starting the new year celebration a touch early with a festive sort of cuisine in Delicioso! The Regional Cooking of Spain by Penelope Casas (Alfred A. Knofpf, New York; 1996). I was lucky enough to get to go to Spain a few years back and walk the pilgrim trail to Santiago; it was an amazing experience, and odds are I'll pepper these posts this week with pictures and stories from the Camino. Like... this one from kilometer 99...a little over 60 miles from Santiago.Pilgrims carry stones with them from their homes and place them along the route; I had one from my mother's yard in Oregon, and one from my yard in DC.

Camino de Santiago, kilometer 99. Photo by Wendy A F G Stengel, some rights reserved.


I ate amazing food in Spain, none of it fancy. Really, not fancy at all. Soups. Stews. Lentils. Cheese. Really filling and tasty. Today's recipe reminds me of that food.

Alubias Rojas de Tolosa con Berza
(Red Beans with Cabbage)


Start prepartion 1 day in advance.

A dollop of cabbage, placed in each bowl of beans, is a delicious complement to this bean stew based on the outstanding red beans that grow in Tolosa in the Basque province of Guipúzcoa along the banks of the Oria River. you can use any kind of red bean to make this dish, but the results will be best with Tolosa, Adzuki, or other dark red beans, sometimes available at food specialty shops.

Serves 4

1 pound small, deep-red dried beans
1 medium onion, peeled and cut in half crosswise
1 large carrot, scraped and cut in half crosswise
1 small leek, well washed
A 1/4-pound piece slab bacon, preferably fresh (otherwise cured)
1/4 pound sweet chorizo
2 tablespoons olive oil
1 medium onion, finely chopped
6 cloves garlic, minced
2 teaspoons imported sweet paprika

Sauteéd Cabbage
3 tablespoons olive oil
1/4 cup onion
2 cloves garlic, minced
1 small head cabbage, coarsely chopped
Salt
Freshly ground pepper

Soak the beans overnight in water to cover. Drain, then combine in a large pot with 6 cups fresh water and bring to a boil. Reduce the heat, add the onion, carrot, leek, bacon, and chorizo. cover and simmer 1 hour.

Meanwhile, heat the olive oil in a large skillet, add the chopped onion and garlic, and sauté slowly until the onion has wilted. Stir in the paprika, then add to the beans. Season with salt, cover, and continue cooking about 30 minutes more, or until the beans are just tender. Wipe out the skillet.

While the beans are cooking, prepare the cabbage. Heat the oil in the skillet and sauté the onion and garlic until the onion has wilted. Add the cabbage, salt, and pepper and stir-fry about 10 minutes. Cover and continue cooking until done to taste.

Serve the beans in soup bowls, accompanied by crusty country bread. Heat the cabbage, transfer to a serving bowl, and pass separately. Typically, a spoonful or two of cabbage is placed in the soup bowl, off to one side--not mixed into the beans.
Yes, please. This would be such a welcoming dish to find at a pilgrim's table after walking 30 kilometers (or even after 3). Hearty. Simple. Serve it with the bread (oh, the bread in Spain!) and a glass or two of wine. My thoughts on wine: stick with Spain, and stick with northern Spain. An Albariño would go great with this, and I know--Albariño is from the northwest of Spain, and Tolosa is in the northeast, but it'd still taste great. I'd go a bit off-local on red, too, and pour a Ribera del Duero.

I feel like going off for a bit on the wines I tasted along the Camino, but I suspect I'll be wandering through that topic a few times this week.

Wednesday, July 14, 2010

Plan For Future Happiness: Tutti-Frutti

I've been gorging myself on berries lately; 'tis the season, after all. Blueberries with breakfast. Blackberries with lunch. And while I'd love to tell you about how you can set up jar after jar of preserved summer splendor, let's face it: I live in a tiny 1937 apartment, I have no storage space for such bounty, and my stove top lacks the oomph needed to efficiently get a big kettle of water boiling sufficiently to make preserving jams and jellies and whatnot a pleasant experience. Also, unless you've gone out and picked your own fruit, odds are you don't naturally have enough fruit on hand at any given point to do a proper day of canning. Favorite Recipes from Matinicus Island Maine has the solution for you: preserve the fruit you get as you get it, in a crock, no fuss, no muss.
Tutti-Fruitt

Put 1 pint brandy into a stone jar, add various fruits as they come into market. To each quart of fruit add same quantity of sugar, stir mixture each morning until all fruit has been added. Strawberries, raspberries, apricots, peaches, cherries, pineapple are the best to use.

-- Mrs. Day's Mother's
Aaaaah, tutti-frutti. All fruits. Let's get this out of the way: Yes, you can purchase the fruit especially for this.

You can also use this as a way to keep the fruit that you bought too much of at the store that day you swore you were going to drop thirteen pounds before your high school reunion.

Strawberries should be washed and hulled; you needn't slice them up. Raspberries should be washed. Halve your apricots and take the stones out; you don't need to skin them. Peaches, on the other hand, you'll need to peel (it's not as hard as it seems, but it does involve a big pot of boiling water and a big bowl of ice water; ask if you have questions). Cherries should be washed, stemmed, and pitted. Pineapple should be purchased already cored and peeled.

Okay, the last one was a joke. Though I won't mind if you do buy it pre-prepared. But you can honestly do it yourself.

You can use other berries (blue, black), or other stone fruits (plums, plums, plums) (and nectarines). Use the juicy soft fruit that you have on hand.

All that stuff is easy. The stone jar might be a bit more difficult. If you're lucky, you'll have a big 5 gallon pickling crock at hand. I have one, and yes, you may be jealous. My mother-in-law gave it to me. Okay, she might have given it to us, but I've thoroughly claimed it. To do this recipe up right, you're going to need at least a 3 gallon non-reactive container. You also have to be able to disinfect the hell out of that beastie; fermentation is our friend here, but mold is definitely not. You're also going to want to keep this puppy in the dark, and keep it covered; bugs and vermin are also not our friends.

When is it ready? Well, one could argue that it's always pretty much ready. But if you want to make it extra super duper special, keep it fermenting away until Christmas time. Yes. Really. Even if you started it with the very first strawberries of March. December. And wouldn't you appreciate a taste of spring and summer in the bleak mid-winter?

Now, you might be asking yourself how to serve your tutti-frutti. Try it over ice cream. Try it under whipped cream. Try it whooshed up a bit in a blender with some cream cheese and yogurt to make a dip for gingersnaps. Try it on pancakes or pound cake or chocolate cake. Try it in a cake -- perhaps we can scrounge up a good old fashioned tutti frutti cake recipe from someone's grandma in one of these books.

When the fruit's all gone (or even before), use the syrupy liquid as, well, syrup. Your waffles will thank you.

Monday, July 12, 2010

Matinicus Islanders Don't Need Instructions: Grapenut Puddings

Today, two recipes, one key ingredient, and not a lot of instructions to get in the way. The Ladies Aid really do expect you to know what the hell you're doing in a kitchen... many of the recipes in Favorite Recipes from Matinicus Island Maine have only the vaguest sketches of a method to guide you.
Baked Grapenut Pudding

4 eggs
1 quart milk
1 cup grapenuts
1 cup sugar or sweeten to taste
Pinch of salt
1 teaspoon vanilla

Bake like custard in moderate oven. Test as for custard. Serve with whipped cream.

--Carrie Ames
Got that? Good. That's all you're getting out of Carrie Ames. So, if you're not up for doing anything "like custard," hop on over to What's Cooking America to read up on Old-Fashioned Baked Custard. If you've ever made a creme brulee, you've made a baked custard. Is the recipe a bit less scary if I say "Bake like a creme brulee"? We're a long way from Matinicus in the 60s.

If the whole custard/creme thing is making you shy away from the potential wonder of baked cereal desserts, try this:
Grapenut Pudding

Put 1/2 cup minute tapioca in 3 cups cold water. Cook until clear. Then add:

1/2 cup grapenuts
3/4 cup brown sugar
1/2 cup raisins or dates
1/2 cup walnuts

Cook a few miutes -- Cool and serve with whipped cream.
This recipe isn't attributed to any particular Matinicus Ladies Aid member. Is it because the author knew her Grape-Nut pudding to be less decadent, less tasty than Carrie Ames's? Did they have a bet, and she who won a Grape-Nut Pudding Off got to have the glory?

Grape-Nuts was my favorite cereal when I was a kid. Yes, really. I love the sweet malty goodness of it. I love when the crispiness starts giving way to soggy soggy bliss. I love it hot. I love it cold. I love thinking of it as a big "screw you" to Kellogg and his comparatively insipid corn flakes. I think it's kind of cool that the ladies of Matinicus treat Grape-Nuts as a generic ingredient. I know the good people at Post cereals probably wouldn't share that glee, so be sure that you always respect brand trademarks.

Unless you're quoting a cookbook, of course.

Sunday, July 11, 2010

Substitution Time: Joe Bunkers or Brambles

When I was a wee tyke, and my mom would make pie, my sister and I got to have the crust scraps. Sprinkled with cinnamon sugar, baked up, tasty as all heckfire. So, when I saw the recipe for Joe Bunkers or Brambles in Favorite Recipes from Matinicus Island Maine I knew it had to be featured here. I don't know if the name options are "Joe Bunkers" and "Brambles" or "Joe Bunkers" and "Joe Brambles." I'm going to be a rebel and say that you can call 'em any of the three, or even call 'em "Joes." Substitute the name you prefer. Substitution is going to be key for this recipe.
Joe Bunkers or Brambles

Make rich pie crust. Roll thin. Cut in large squares. In center of each square put in a spoonful of filling.

Filling
2 eggs
1 cup sugar
Juice and grated rind of 1 lemon
1 cup chopped raisins
5 or 6 Royal lunch crackers, rolled fine (If too moist take more crackers.)

Fold corners of square up to filling. 400° oven -- Bake until lightly brown.

--Carrie Ames
Now, you should know, there's no such cracker as a Royal lunch cracker anymore. They aren't being made anymore, and the first choice substitute is also not being made anymore. You can try your hand at making your own milk lunch cracker or buy the next best to the next best thing: the Vermont common cracker.

I'm here to tell you: the Vermont common cracker has next to no flavor. If this is what milk lunch crackers tasted like, I'm not at all surprised they're off the shelves. I had assumed that the crackers were a local type of Ritz cracker. I thought the recipe was for a sort of mini Mock Apple Pie. I'm a big fan of Mock Apple Pie, and a big fan of mini whatnots.

My advice: unless you're from New England, and have been raised to love (or even tolerate) the incredibly bland blandness of a common cracker, boldly substitute. Boldly substitute! Do the recipe as written, but crush up a bunch of Ritz crackers. Bring their buttery goodness to your Joes party.

Monday, July 5, 2010

Not the New Fashion: Old Fashion Pork Cake

I'm hard-pressed to come up with a suitable introduction to today's recipe from Favorite Recipes from Matinicus Island Maine. It's a war-time cake, though would work for any time the cows aren't giving milk or the ferry isn't bringing dairy goods over to your island. Other recipes for cakes like this include dried fruit...you may do so if you wish. In this case, I back down off my "raisins aren't optional" stance.
Old Fashion Pork Cake

2 cups molasses
2 cups salt pork, cut fine
2 cups boiling water, turn over pork
2 cups brown sugar
2 teaspoons soda
2 teaspoons cassia
2 teaspoons cloves
2 teaspoons allspice
2 teaspoons nutmeg
2 teaspoons ginger
3 eggs
8 cups flour

Makes 4 loaves, bake 1 hour, not too hot an oven.

--Mrs. Raynes
Yes. Pork cake. Pork. Cake.

I think one of the reasons this is of the old fashion is the amount of ingredients. See that nice long list of twos? Easier to remember a recipe if you can just say 2, 2, 2, 2, 2; 1/4s and 1/3s and 1/8s and whatnot are much more fussy. I'd be willing to hazard a guess that it was originally two eggs, too; the third egg will make the cake rise a bit more, though, so stick to it.

With this entry, I'm going back and editing the publishing date for Favorite Recipes from Matinicus Island Maine from 1970s to 1960s. See, I found Verna Ames who gave us the Tomato Soup Cake recipe--I love the internet. She wrote back and said that she remembered the book being from the 1960s, and I trust her memory.

Sunday, July 4, 2010

Glory, Glory, Halleluia: Glorified Apple Pie

It's a hot, sunny fourth of July here in Washington, DC. Chefly Husband and I took our dog down to the Palisades parade, bought lemonade from a lemonade stand, ate sausages off the grill, and shouted "votes for candy" at more than one passing politician. Yes, it's a right proper Independence Day! In light of that, we'll take a slice of Americana from Favorite Recipes from Matinicus Island Maine-- apple pie.
Glorified Apple Pie

Prepare McIntosh apples as for regular apple pie, and place on bottom crust. Mix 3/4 sugar and 1 package of strawberry jello. Add this to apples, put on top crust and bake as usual. Wonderful served with ice cream.

--Adella Ames
Baseball, hot dogs, apple pie, and Chevrolet, folks.

Adella Ames (yes, another Ames...the same surnames repeat throughout the cookbook. It's a small island, after all.) assumes you have a usual way of making an apple pie. I assume nothing of the sort.

You need pie crust enough for a bottom crust and a top crust. Use your favorite pie crust recipe; of course, if you have a favorite pie crust recipe, you probably don't need to be told how to make a pie. So, you know, feel free to use the pre-made crust in the refrigerator section of your local grocery store. I won't tell, and as long as you use the fridged stuff and not the frozen stuff, odds are no one will really notice you didn't make it yourself. Line your pie plate/tin with one of the crusts, and then put it in the fridge to stay nice and cold.

Next, take a big ol' mixing bowl, and put it near your apple peeling and chopping station. Don't have one? Of course you do. Any cutting board will do, and I'd recommend using a vegetable peeler to peel your apples, but if you want to pare your apples with a paring knife, more power to you. Extra style points if you get the peel off in one long spiral (though, again, if you're that practiced, you're probably not in need of a walk through of pie making). You'll need about 8 apples. Peel 'em, cut 'em into quarters, and cut away the seeds and core. The seeds and core go in your compost bin or trash bin, not the pie.

Use your handy dandy paring knife and cut the apple quarters into bite-sized chunks, and put the chunks in the bowl. Sprinkle on 1/4 teaspoon nutmeg, and 1/2 teaspoon cinnamon. Sprinkle over that a couple tablespoons of flour -- the flour will help the pie set up, though I'm guessing that with the Jell-o, you're not going to really need it. I often forget it; it will still taste good. Squeeze in about half a lemon worth of lemon juice. Mix it all up, take the pie plate out of the fridge, and pour the apple mixture out into the crust, mounding it up in the middle if you have extra. Take a tablespoon or so of butter, and cut it into little chunks, and put those chunks sort of randomly over the apples. That's called dotting with butter. Now you know. At this point, you've prepared a pie "as usual," and can pick up with the instructions from Adella.

The top crust will need to be vented -- you need to make vents in it to let out the steam of the apples cooking. You can get all sorts of fancy, cutting out shapes, making a lattice out of strips of pastry, or whatnot, but for your first pie, I'd say just cut a few slits in the crust with your paring knife. Lay the top crust over the apples, and seal the edges of the two crusts together, either with your fingers or the tines of a fork (pressing down with the flat bit). A 350°F oven is your friend, and cook until your crust is pretty and brown and there's appley goodness coming out a bit.

Now you, too, have a usual apple pie method. You'll get fancier as you go, with the aforementioned crust treatments, egg washes, crumble topping, mixed fruits, etc., but this gets you going.

Happy Independence Day.

Thursday, July 1, 2010

Favorite Recipes from Matinicus Island Maine, by the Matinicus Ladies Aid Society; Tomato Soup Cake

I love The Wine Lover's Cookbook but have to admit that after a week of glossy pictures, perfect binding, and lengthy descriptions of every little thing, I'm psyched to go a little more rustic. So, it is with more than a little bit of glee that I present Favorite Recipes from Matinicus Island Maine by the Matinicus Ladies Aid Society.

Matinicus Island is a small island off the coast of Maine, about the size of Rathlin Island in Northern Ireland -- the comparison might not mean much to you, but I had a heck of a wonderful day tromping about Rathlyn last summer. Anywho.

I've never been to Matinicus Island (or any other part of Maine), so have to assume that my friend Jeannette's grandparents went there at some point. I owe much of my cookbook collection to Jeannette's grandmother's pre-move book culling. Many of those books are comb- or spiral-bound fundraiser fodder, and old enough that the regional books still have some regional flair. Too often nowadays, collections from all over are woefully homogenized. Not so with Favorite Recipes from Matinicus Island Maine -- the recipes use both local ingredients and, vital for a remote island, canned goods. Yes, canned goods. Nothing wrong with a canned good or three! And, if you're on an island in New England during a winter storm, when boats aren't going out and ferries aren't coming in, what the heck else are you supposed to use to feed your family. Canned goods, for the win.
Tomato Soup Cake

8 tablespoons shortening
2 cups sugar
2 teaspoons soda
4 cups flour
1/2 teaspoon salt
2 teaspoons cinnamon
2 teaspoons soda
2 teaspoons cloves
2 teaspoons nutmeg
1 can tomato soup
1 can water
2 cups seedless raisins and fruit

Cream shortening and sugar; then add soup and soda; then add the water gradually. Bake 1 hour in 350° oven. I use the candied can fruit.

--Verna Ames
We're back in the land of assuming you know how to cook, folks. If you're used to making cakes, you don't need step by step here, just the skeleton to show how and when you're adding the liquid to the mix. I'll step by step it a bit more for you:
Cream the shortening and sugar together in a big mixing bowl. Add the soup and the 2 teaspoons of baking soda -- though the recipe as printed calls for a total of 4 teaspoons soda, we're pretty safe in guessing it's just a misprint. The soup and baking soda are standing in for eggs in this recipe, so they go in when eggs would go in otherwise. Have you stirred in the soup yet? Stir, baby, stir. Then, add the water, and stir some more. Sift all dry ingredients together, and then add the dry mixture to the sugar/soup mixture, but not all at once. Add in a quarter of the dry, stir. Add another quarter, stir. You get the gist. Once that's all come together, add the fruit and stir some more. Ta da! Cake batter. Pour that into a prepared cake pan -- butter and flour it, or spray it with baking spray. Size of pan we'll have to guess at: I say try it in a 9 x 13, but that surprises you not in the least.
I think it bears saying it in its own paragraph: the soda in the ingredients list is baking soda. It is a dry ingredient, and is added with the liquids, not sifted in with the other dry ingredients (unless the aforementioned typo wasn't actually a typo -- if your cake comes out a little flat, add the extra soda to the dry ingredients next time). Baking soda, not club soda. All clear? Good.

This recipe is vegan-friendly, as long as you're grabbing a vegan-friendly tomato soup. No, really! Vegan cake! That will taste good! That you can serve to your vegan friends and make them feel pampered and loved, and you'll still want to eat it, too! If you're in/from the US, you might want to try this out for your Independence Day party this weekend.

Sunday, June 27, 2010

Cooling Off Period: Crab, Jicama, and Mango Salad with Lemon-Curry Dressing

Heck, even I think it's crazy to contemplate turning on a cooking apparatus today. The heat index value is going to be up around 103° today, the air quality is poor, and there's just no. fricking. way. I'm turning on a heat-producing device. No. No.

No.

And I don't suggest you do, either. Thankfully, neither does The Wine Lover's Cookbook: Great Recipes for the Perfect Glass of Wine.
Crab, Jicama, and Mango Salad with Lemon-Curry Dressing (Classic Pairing)
Recommended Wine: Chardonnay
Alternative Wine: Viognier

This combination works because the richness of the succulent crab meat, the tropical fruit flavors of the mango, and the lightly curried citrus dressing help showcase the ripe tropical fruit and citrus flavors found in many chardonnays. The use of curry powder enlivens the dressing just enough to play into the spice character fhtat comes from the wine's barrel aging. Viognier, with its opulent texture, also marries well with this elegant appetizer.

1 pound crab meat, picked over for shells
3/4 cup diced fresh or frozen mango
2 1/2 tablespoons minced fresh chives
1 cup peeled and diced jicama

Dressing:
Juice of 1 lemon (Meyer lemon, if possible)
1 teaspoon minced lemon zest
1/2 tablespoon white-wine vinegar
1/3 cup sour cream
1 1/2 teaspoons curry powder
1/8 teaspoon fresh ground black pepper

12 leaves butter lettuce, rinsed and dried

Garnish: chopped chives, 6 lemon slices

In a medium nonreactive mixing bowl, combine crab meat, mango, chives, and jicama and mix well.

To make dressing, in a small mixing bowl, combine all ingredients and whisk thoroughly. Add dressing to crab mixture and combine thoroughly. Allow to sit, refrigerated, for at least 2 hours. Season to taste.

To serve, place 2 butter lettuce leaves side by side on each salad plate. Mix crab thoroughly. Spoon mixture equally onto lettuce leaves on each plate. Sprinkle with chopped chives and garnish with lemon slices.

Serves 6 as an appetizer
I had the great joy of spending yesterday evening on a boat in the South River, right where it feeds into the Chesapeake. That is to say, I was in crab country. When it looked like my carload of boat party people wouldn't arrive in time (there was a bit of a snafu that led to me, my car, and my passengers being about an hour south of where we were supposed to be...), I thought "well, at least we can get some crab." Summer and the mid-Atlantic practically scream out for the beautiful swimmer -- that's what the Latin name for blue crab means: Callinectes sapidus = beautiful swimmer...poetic, no?

Crab would normally be about $16 a pound at this time of year, Chefly Husband tells me. Instead, domestic crab is selling for about $24 a pound, thanks to the devastation in the Gulf. Depending on your budget and your food-as-politics leanings, you might want to file this recipe away until crab is more affordable, or you might want to hang the price and support domestic fisheries (perhaps I took the front matter in the Cook Book Presented by The Fishwives of Charleston Oregon a bit too much to heart).

I've been a stone's throw from the Chesapeake for two decades now (and I have the high school reunion invitation to prove it), but have to admit that, while blue crab is all well and good, it's not the real crab.

The real crab is Dungeness. No one can convince me otherwise. It's the best crab. It's the Master Crab! (Even its Latin name used to say so: Cancer magister.) Of course, I don't really ever think of using Dungeness in a recipe. There's no need. The stuff is perfection right out of the shell.

My devotion is shared by my family back in Oregon. When Dad was out to visit a while back, we went to eat at Chefly Husband's restaurant, and I had the crab cake. Now, Chefly Husband's restaurant does pretty much the best damned crab cake you'll ever have in your life. No lie. This is not spousal love talking, it's just plain fact.

Dad had a bite. Dad said, warmly, "that's the best crab cake that doesn't have Dungeness in it."

Can't really argue with that.

Thursday, June 24, 2010

You Don't Spell It, You Eat It: Fig and Raspberry Clafouti

It's brutally hot in DC today--we hit 100°F (37.7°C, for those of you who, you know, use metric). I had two hearty pasta dishes flagged as blog fodder, but couldn't bear to even think about boiling a big pot of ... no, don't make me say it. Nothing heavy, please. Nothing steamy. Something simple...

So, you'll think I'm crazy when I say that today's recipe from The Wine Lover's Cookbook: Great Recipes for the Perfect Glass of Wine involves....baking. Yes. I'm saying you should turn on your oven. Even though it's brutally hot out. You can scurry out of the kitchen when it's on, and place yourself in front of a fan or an air conditioner (or both); it'll be okay.
Fig and Raspberry Clafouti
Recommended Wine: Sauternes
Alternative Wine: Port

Clafouti is not a terribly well-known dessert. Its origins are in the south central part of France where a batter cake, typically made with black cherries, is a traditional and much loved delight. This version resonates with the lush, honeyed sweetness of late summer figs and slightly tart raspberries, a truly magical combination that wraps its flavors around the honey-like quality in aged sauternes. Port is a suitable alternative that works well with the fig flavors.

2 cups quartered figs
2 cups raspberries
1/2 cup sliced, blanched almonds
1 cup all-purpose flour
1/3 cup plus 2 tablespoons sugar
2 large eggs
1 cup milk
3 tablespoons port
2 tablespoons cold unsalted butter, cut into bits

Preheat the oven to 400°F. Arrange figs cut side up in buttered 8-by-8-by-2-inch baking dish and sprinkle in raspberries. In a blender or food processor, finely grind the almonds with the flour. Add 1/3 cup sugar, eggs, milk, and port and blend well. Stop occasionally to wipe down sides as necessary. Pour the custard over the fruit, dott with butter, and sprinkle with the remaining 2 tablespoons sugar.

Bake on the middle rack of the oven for 30 to 40 minutes, or until the top is golden and the custard is set. Let cool for 20 minutes. Serve with a dusting of powdered sugar.

Serves 6
I love figs, and no doubt the suitable-for-August heat has me thinking of late summer fruit instead of more seasonally appropriate choices (see: aforementioned black cherries). Usually, when I have figs, I rip off a hunk of bread, smear on some chevre, and then tear open a fig and smoooooooosh it in on top of the cheese. I eat. I repeat. Figs never seem to last long enough to end up in a cooked dish. Well, you know what I mean, figs keep, but they don't last near me. They are not safe; guard them if you want to have any share in them.

A few Sundays back, Chefly Husband and I went to some friends' house for grilled lamb and shiraz; dessert was clafouti. So I say with confidence: this is a good hot day dessert. Yes, your kitchen will heat up. Unless...

Do you have a yard of your own? With plenty of beautiful sunlight? You can give a solar oven a try. I've a friend (who I haven't seen in far too long) who has had great success with her solar cooking. Use that sun for something other than skin damage and keep your kitchen cool.

Since it's summer, I'd stick with the sauternes and leave the port for a cooler day. I also think that a nice ice wine would be good with this, like, oh... Argyle's Minus Five riesling. It's the wine so tasty, it's finally got my sister interested in tasting wine!

If you've no figs available, add more raspberries, or blackberries, or plums (pitted), or cherries (pitted or not, up to you and your estimation of your guests' ability to navigate around the pits gracefully), or... you get the idea. Clafouti is a friend of fruit; use what you can lay your hands on.